Devlog #6 - Upgrading the Building System, Part 1
Resizing bricks while placing, easier reorienting, unified inventory, and a few more usability improvements for Early Access.

My favorite thing to do in Brickadia is watch other people build.
I'm always interested to see the cool things people are making, but I'm most interested in the techniques they use. How they make use of the tools we made - and how they don't. What I found out was in some cases surprising, and has fed into a lot of the new design decisions I've made.
Before we go further, make sure you're not browsing on mobile data! Here's a table of contents for this post:
What Needs Improvement?
Resize-Dragging rather than Row-Dragging
Unusable Brick Reorientation
No Visual Metrics
Bad New Player UX
Complicated Dual Inventory System
Too Little Inventory Space
Unable to Start Floating Builds
More Extensibility Desired
Rewrite the whole building system??
Upgrading the Inventory
Extensible Inventory Slots
More Inventory Space
Keeping your Character Inventory
Selecting Inventory Slots
Upgrading Building
The Core
Aligning Bricks with the Mouse
Placing Floating Bricks
Gizmos and the Preview Grid
Dragging Brick Rows (Old)
Dragging Brick Rows (New)
Resize-Dragging
Rotation and Reorientation
Tool Widgets
Tool Bind Hints
Selection Highlighting
More to Come!
What Needs Improvement?
First, let's talk about what we can learn from how players built in Alpha 5, and how we can use that information to improve the tools for Early Access.
Resize-Dragging rather than Row-Dragging
Years ago, we built Brickadia's original mouse building around point and click placement of bricks, and - as an afterthought intended for people making regular patterned things such as brick walls - made it so that if you click and move the mouse without releasing it, you drag out a row of bricks.
You can do the same thing with a brick template.
This is super efficient for placing rows of the same brick.
Brickadia also supports resizing bricks. It's a separate tool, here.
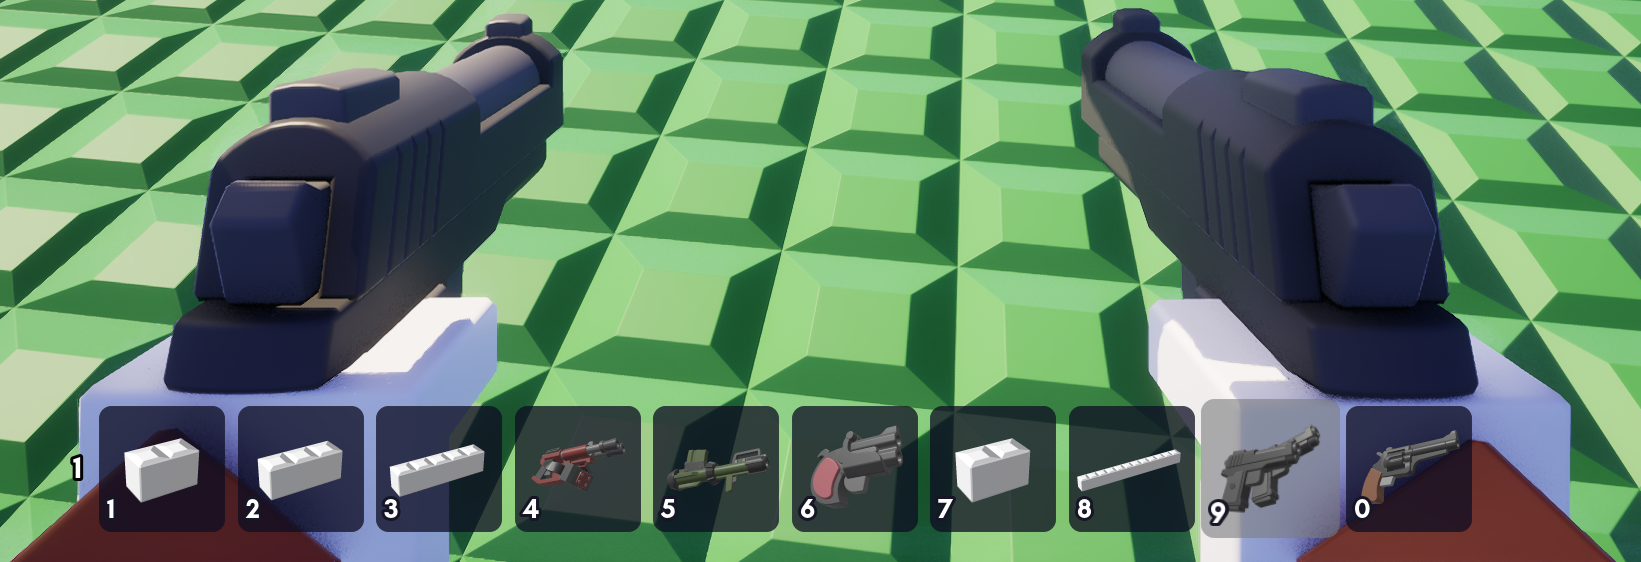
You can resize any brick to any valid size. If you like a certain size, you can pick it into the quickbar with Ctrl-MMB. You can have up to 10 bricks in your quickbar, which seems like enough for most tasks we can think of. And the resizer has quick binds for resizing to the minimum and maximum size:
And so, our thinking went, now all our builders have everything they need to make cool structures quickly. We released these features in the Open Alpha.
Here's how people actually used them:
First, you place a very small brick. Usually a 2x2x2 micro brick, sometimes larger. It's the only thing that's useful to have in your quickbar with this style of building, ever. The size it needs to be is your lowest common denominator - the smallest gap you'd ever need to fit it into, meaning smaller is better. Then, you switch to the resizer. You resize your very small brick to the size it actually needs to be. Then you start over.
At first this is clumsy. It feels bad. It feels like the game is broken. Slowly, though, you grow used to it. You bind the resizer to its own key. You go through this process tens of times, then hundreds of times, then thousands of times. It becomes muscle memory. You learn to do it without thinking. One building away, I'm standing on a roof, watching you. Horrified.
The problem here is that our iterative improvements to the game created a contradictory user experience:
- The placer is designed for a building experience where players build things by arranging non-resizable shapes of different sizes.
- Most of the bricks in Brickadia became dynamically resizable when the resizer was added in Alpha 4.
These players aren't doing this constant switching between the Placer and the Resizer to be annoying contrarians. To actually be able to leverage the resizability of almost every brick in the game, they're forced to do it. The placer tool doesn't let them do so on its own. To add insult to injury, the resizer doesn't snap brick sizes to the current alignment grid, so if you want plate sized micro-bricks you're forced to strain your wrists doing it carefully.
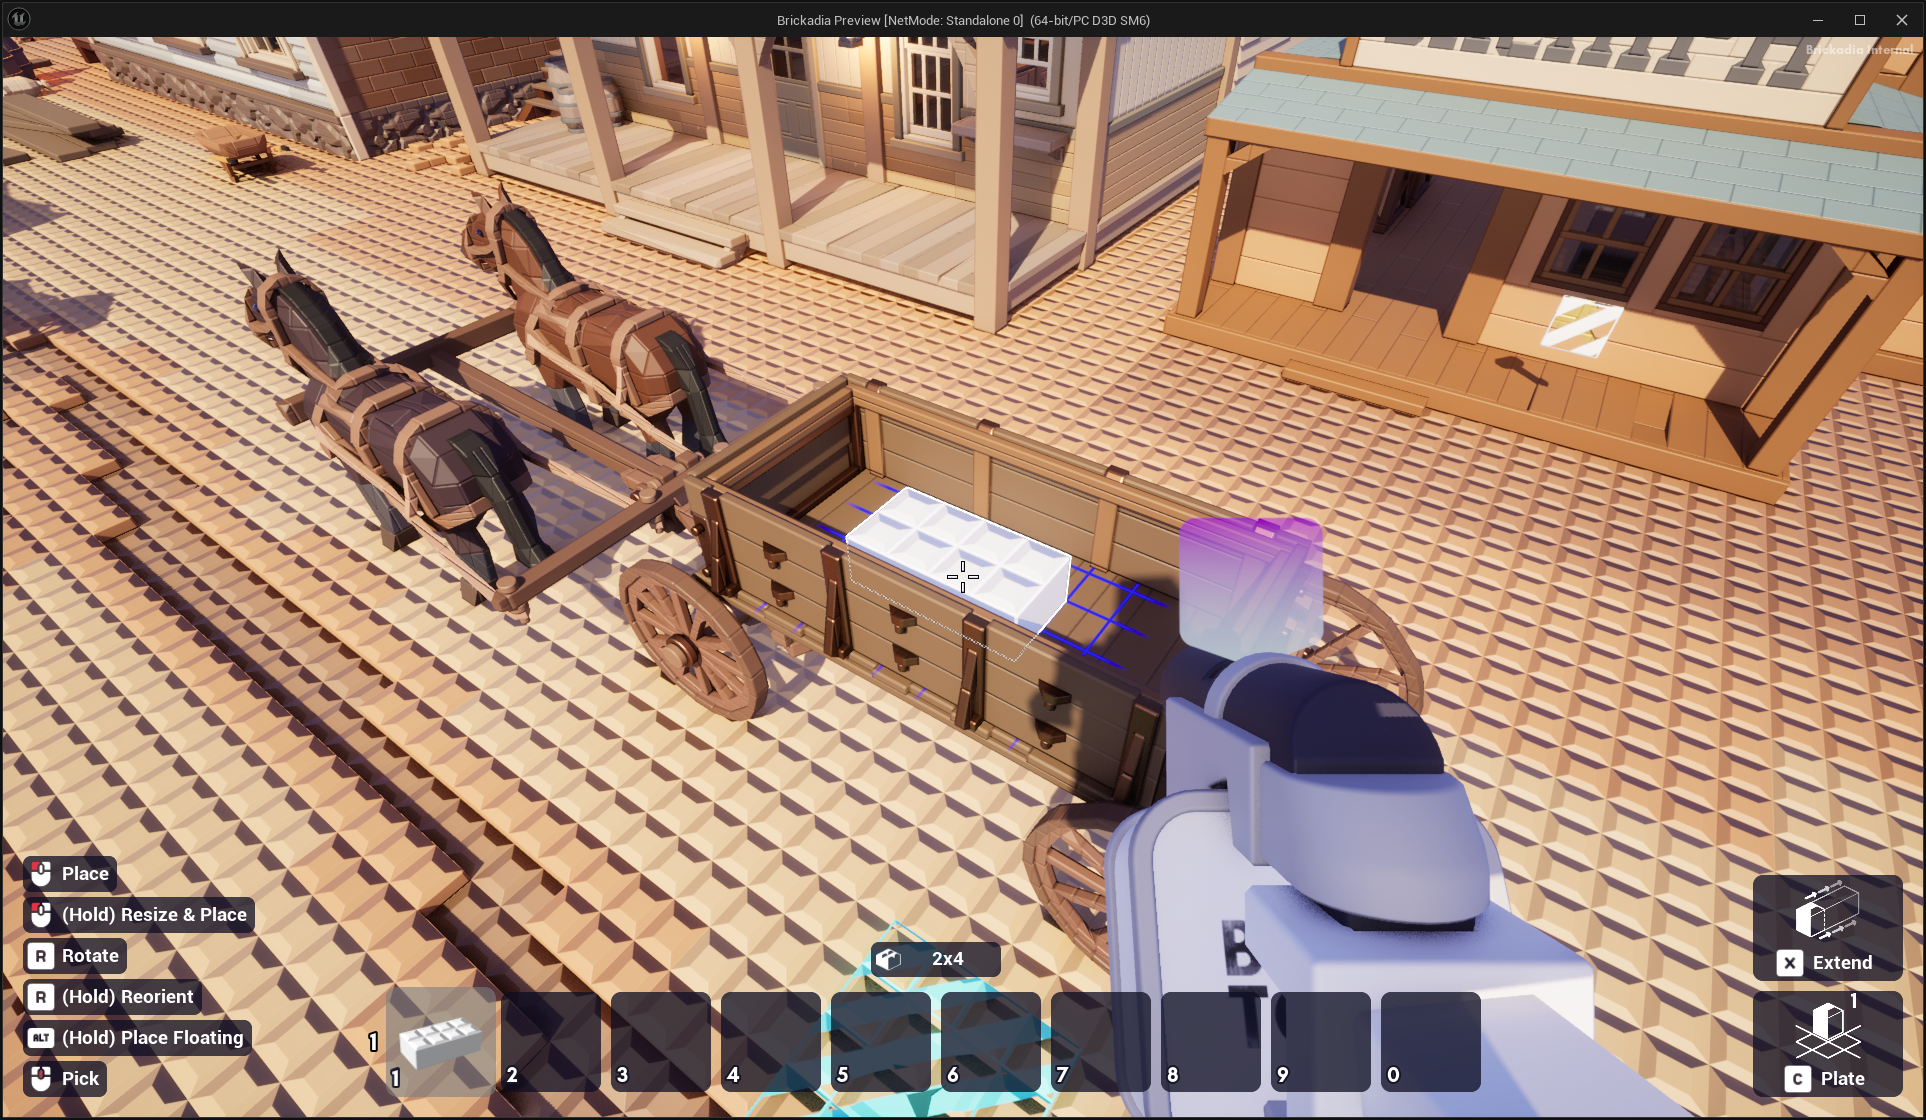
Resizing bricks directly as you place them would make a lot more sense. In reality, there are many more cases where you'd find it handy to resize a brick as you place, than cases where it's helpful to place a row of the same brick.
Therefore, clicking and dragging shouldn't default to row placing. It should place one brick, which resizes according to your drag. In addition, you should be able to resize the brick on all of the axes in one go, so you can make any size you want without ever needing the Resizer unless you want to modify an existing structure.
Obviously, the resizing should snap to the lines of the current placement grid too.
Unusable Brick Reorientation
This one is not that hard and we should have gotten it right the first time.
For most of Brickadia's lifespan it has been a pain to orient bricks to rotations where they are not upright. In Alpha 5, you do this using a horrible keybind called Cycle Brick Orientation (default keybind: Numpad /) that cycles through every possible brick orientation in an apparently random order;
You might notice I miss the orientation I wanted to stop at the first time and have to go through them all again. This is a result of years of training - most people miss the orientation they want at least twice.
This was actually an iterative improvement, because we only gave it a dedicated keybind in Alpha 5 - before then, you had to use advanced trickery with side studded bricks if you wanted to reorient a brick.
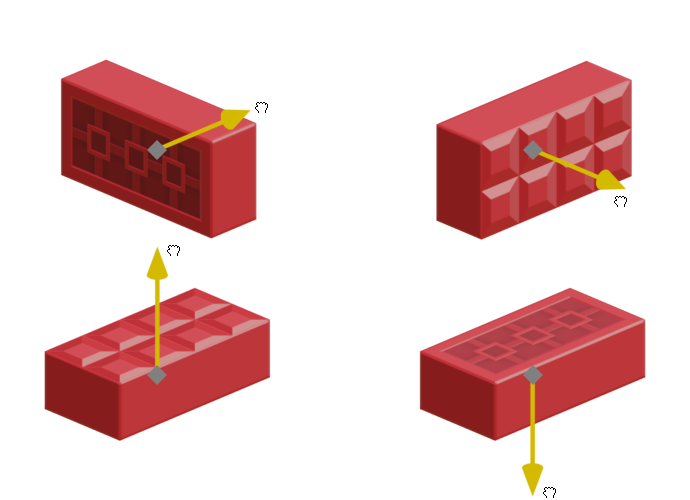
Let's get some insight into what's happening here. Brickadia stores which way your brick points in an enum (called EBrickDirection), with 6 possible values:
/** An axis aligned direction. */
enum class EBrickDirection : uint8
{
	X_Positive,
	X_Negative,
	Y_Positive,
	Y_Negative,
	Z_Positive,
	Z_Negative,
};
EBrickDirection.
Cycle Brick Orientation might seem disordered, but it actually is ordered; it's going through the values of the EBrickDirection enum. This seemed like the way to go at the time, but the order it goes through orientations is actually so confusing that the Brickadia programmers are still the only people it makes sense to.
The fundamental problem is that it is meaningless to tell your players something is X+, Y-, etc, to try to come up with any "natural" order to cycle through the different directions, or to ask them to "set a direction" given a list like the one specified in EBrickDirection. You must let them point in a direction, and then resolve the axis and sign they wanted from that - you must translate how the user understands space to how the computer does.
No Visual Metrics
In the same vein, it's quite strange that not just Brickadia, but so many advanced creation tools find it sufficient to simply display measurements for things only on the HUD, when you're doing something in the world.
I recently watched a GDC talk called Keeping Level Designers in the Zone Through Level Editor Design, which for some reason is now unlisted. A lot of the talk is about texturing and pivots and other things not really relevant to Brickadia.
I found one specific point very interesting though: In Hammer, moveable brushes are positioned as boxes, where we instantly see the measurements of each edge displayed as text on that edge. Not as some "X by Y by Z" formatted size that we have no idea how to translate to the world.
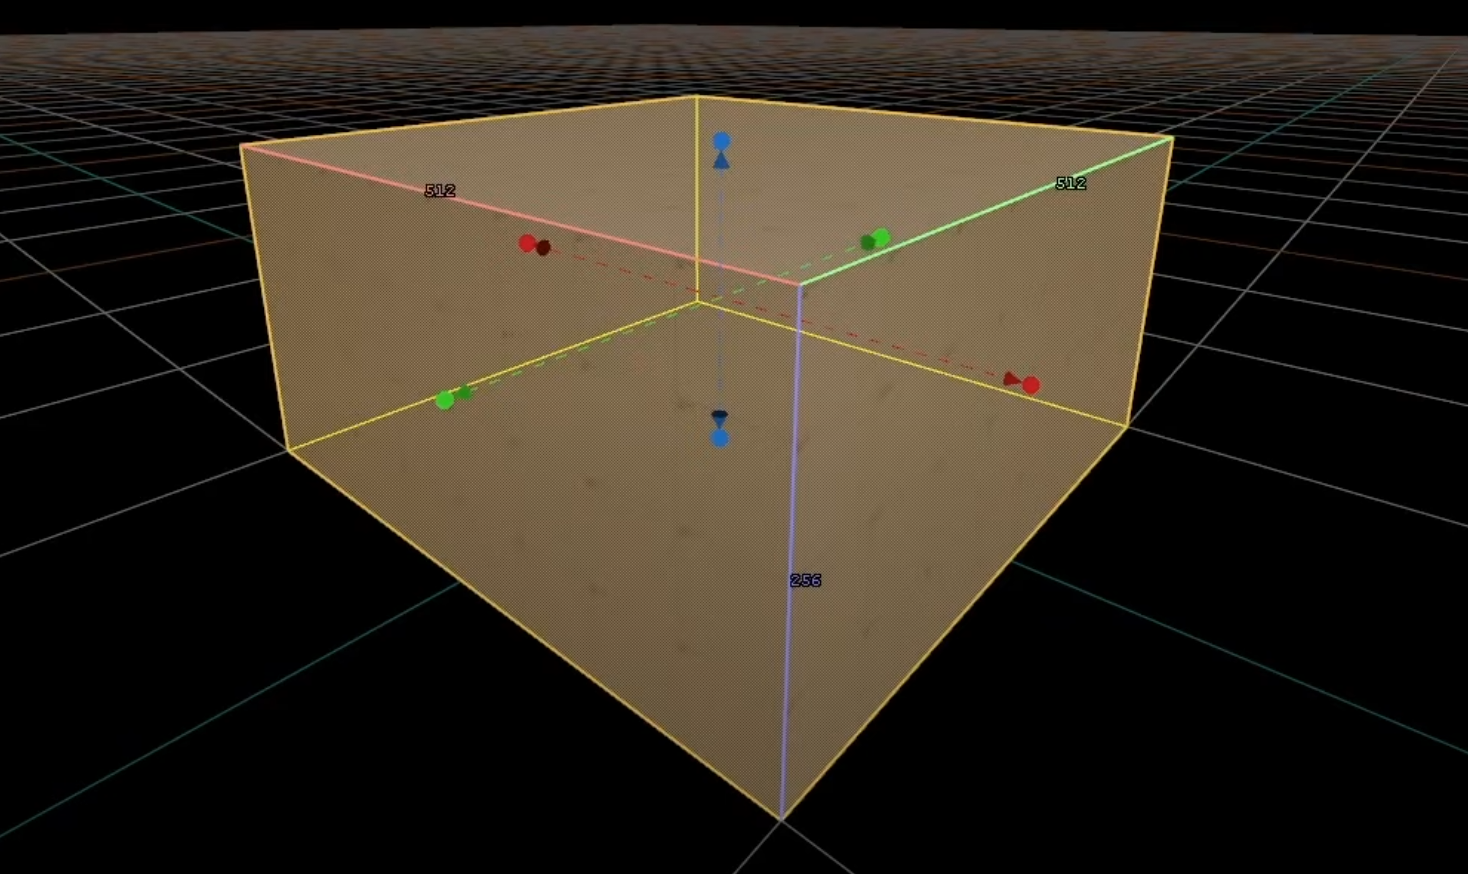
By comparison, the information Brickadia shows you when resizing a brick is completely worthless:

Clearly we can do better here, as well.
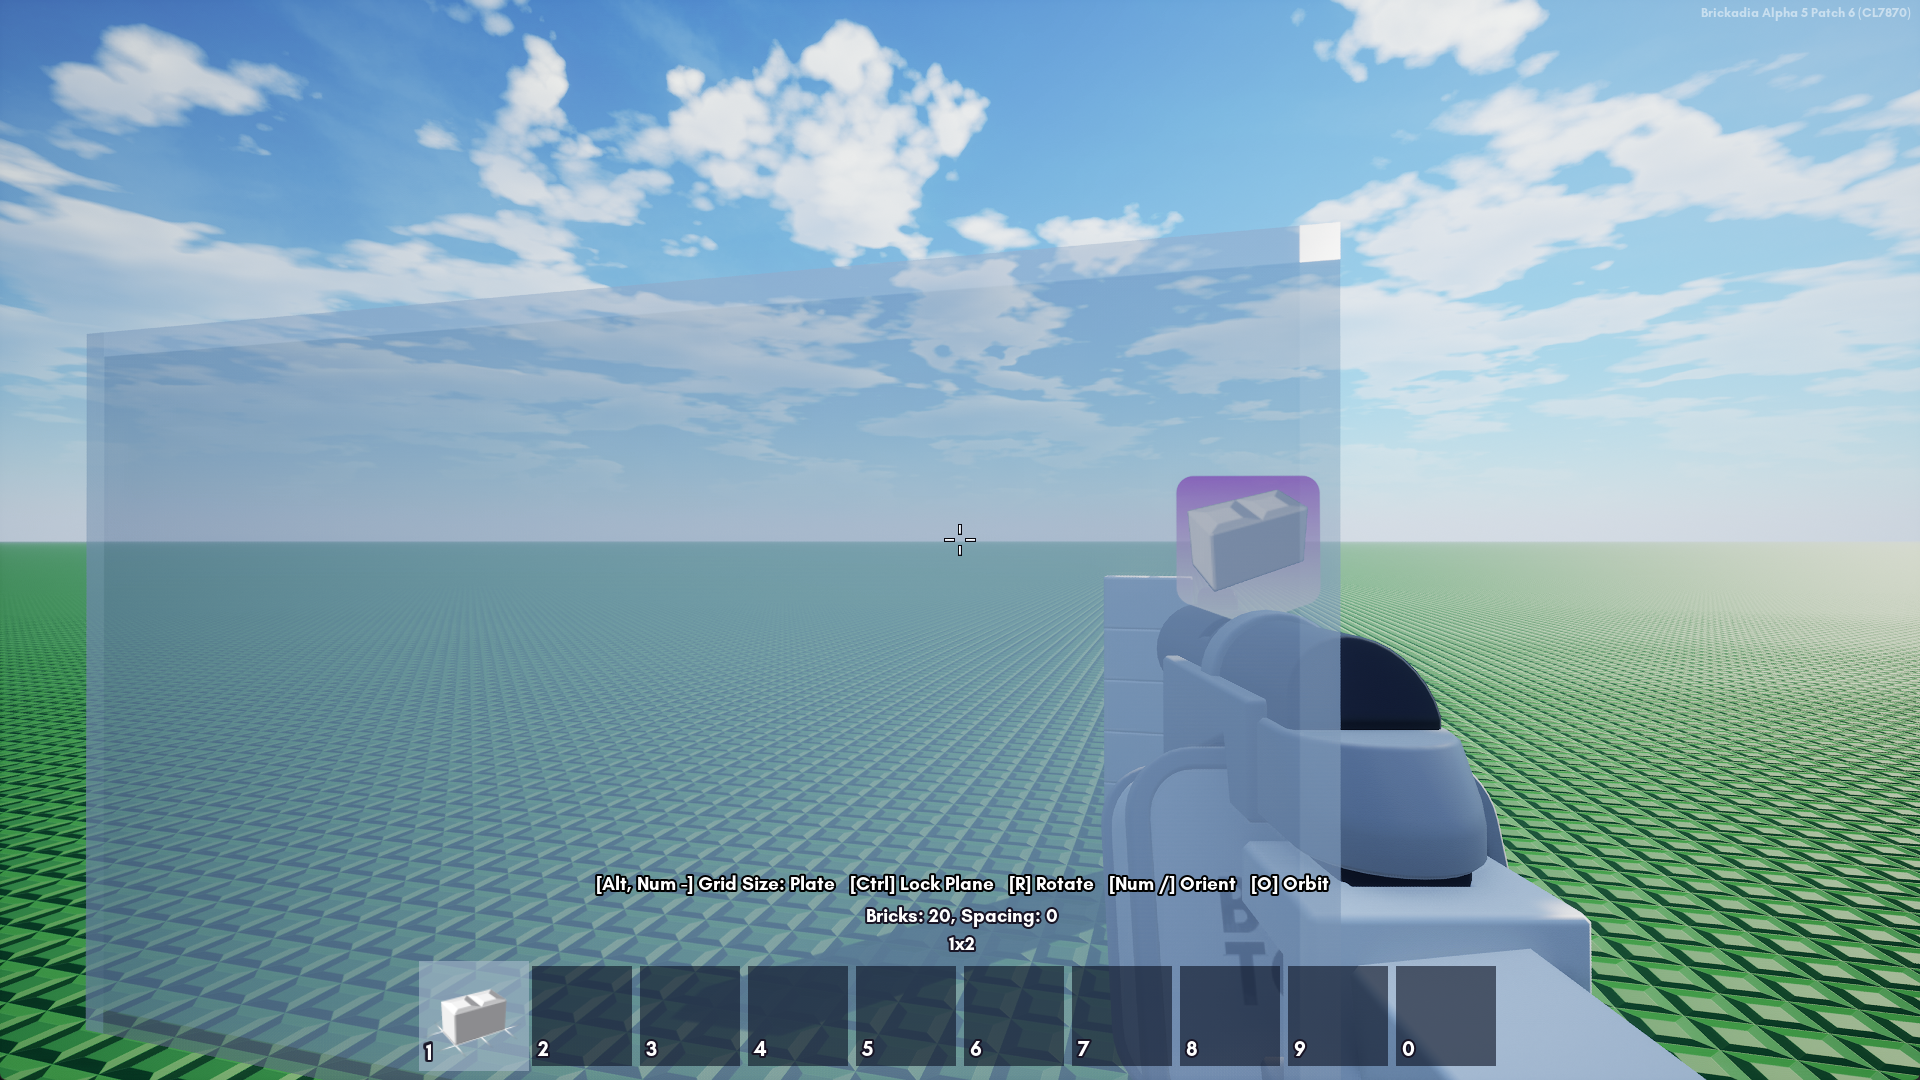
Bad New Player UX
The HUD meant to teach users how to use the Placer is, to put it bluntly, programmer UI:
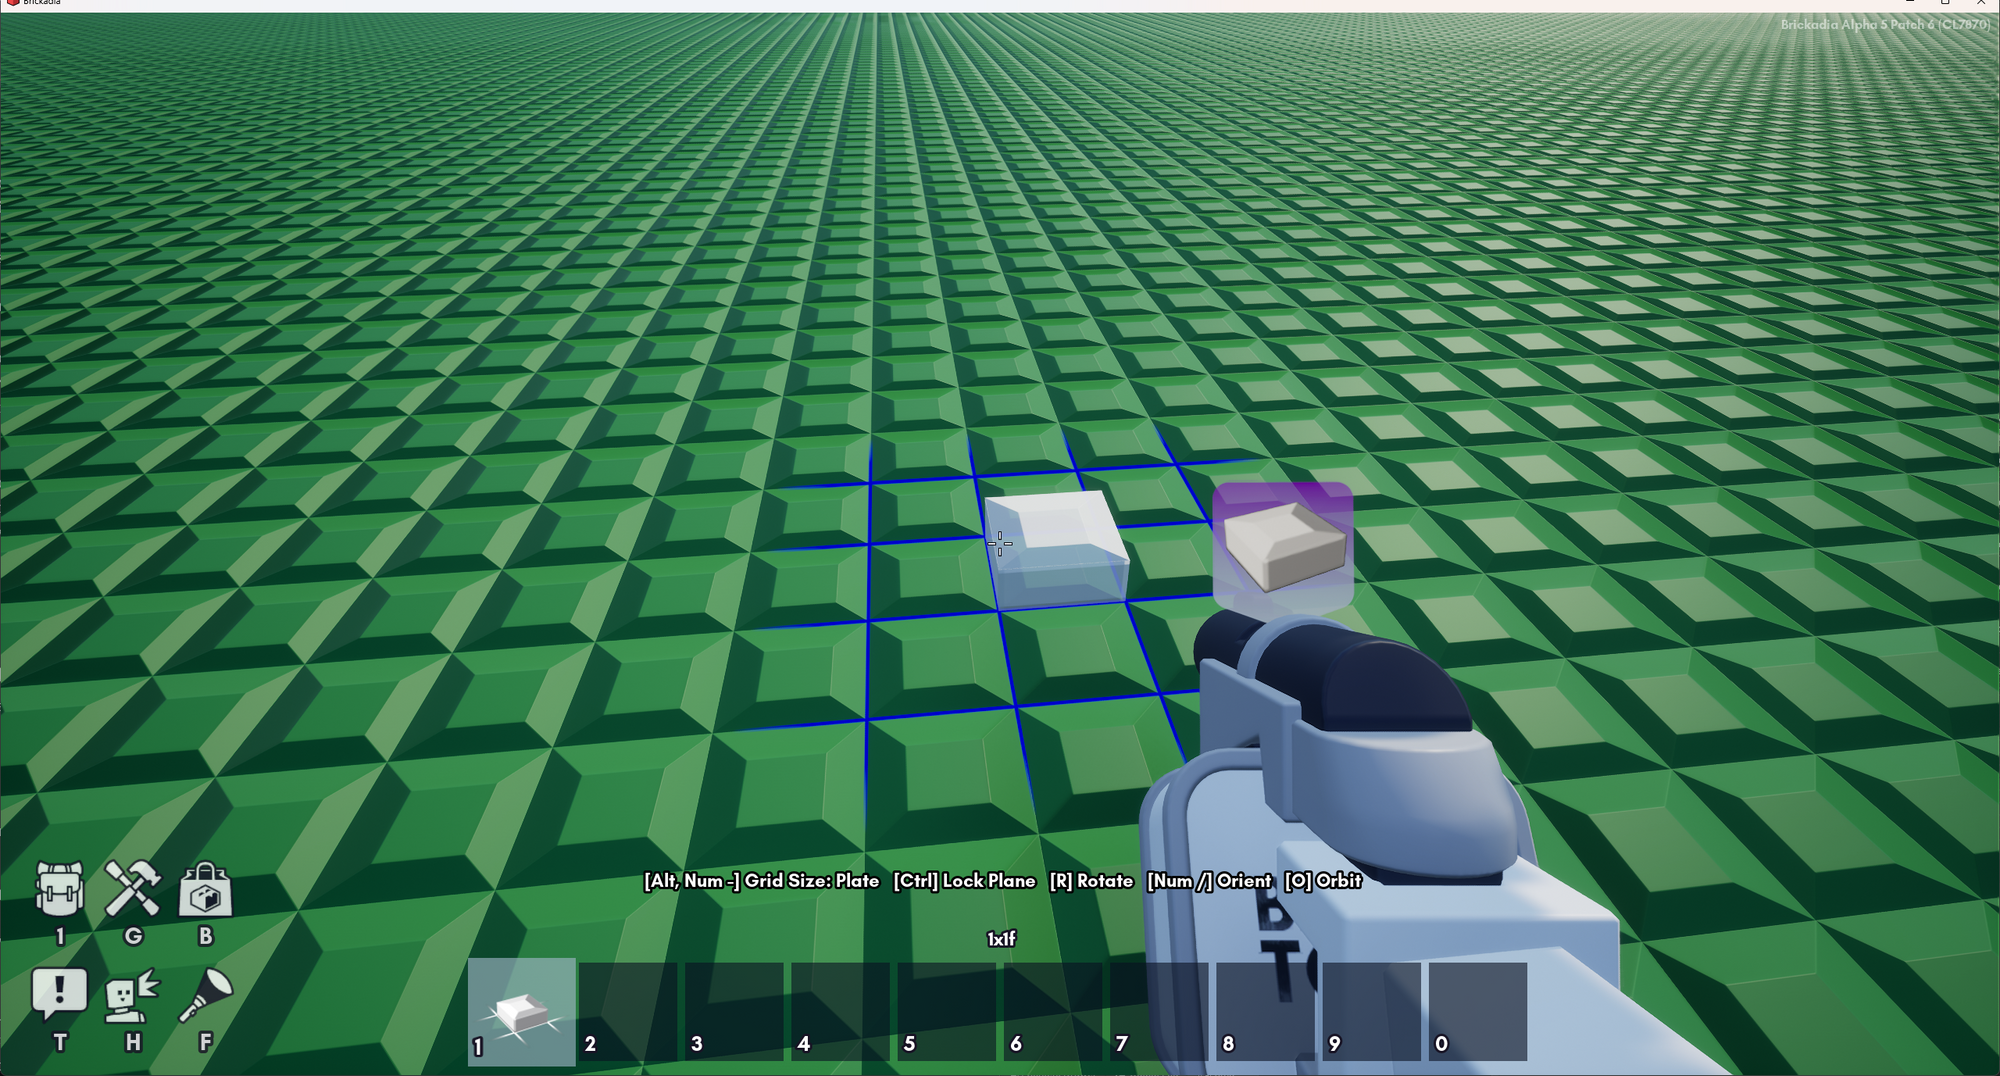
It uses only text, and it doesn't include certain key functions, like picking, at all. It's hard coded to display the default keybind rather than displaying the currently bound key name. In a particularly egregious case - the detached mode controls - it simply tells you to move the brick by using "Numpad".
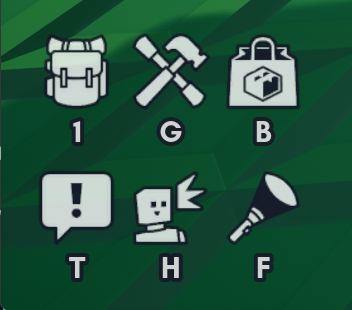
In addition, prompts for keys aren't unified in any way. Down here is a little set of mystery icons meant to show new players how to open the inventory, use tools, use bricks etc, which do change to reflect your current bindings:
Painting has its own style of control prompts again. These, again, don't change to reflect your key bindings, but do change contextually as you navigate the menu.
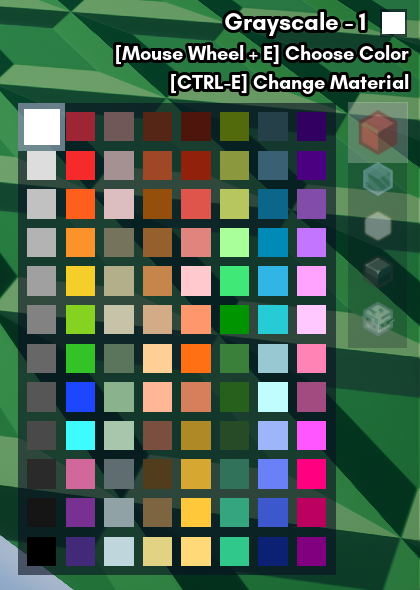
And like the Placer, these are missing things like fill paint, which people have requested me to add to the game at least 15 times not knowing it's already there (alt-click with the paint tool) because there's no hint.
In Early Access we should show control prompts in a way that is more prominent, digestible, consistent, complete and reactive.
Complicated Dual Inventory System
This one was a little contentious. Basically, in Alpha 5, there are two character inventories. We have the brick inventory:

And the item inventory:

This pretty much always confuses new players who don't realize that they have two inventories and need to use Ctrl+Q to switch between them. They should be merged into one inventory which can contain both bricks and items, like Minecraft, Space Engineers, Stardew Valley, or basically any other game do.
Too Little Inventory Space
The inventory needs more space than just the 10 slots if we want people creating RPGs, salvage gamemodes and other experiences! This is doubly necessary after the last change as items now share space with bricks. Something that has been requested a lot is more than one quickbar, which advanced users could find very helpful.
We can design things so that only the currently selected quickbar is considered for adding new items, eliminating cases where new users might otherwise "lose" an item in a different quickbar.
Unable to Start Floating Builds
People often want to place things in mid air. Brickadia is supposed to be a game that is okay with you placing things in mid air. However, regardless of mode, the controls make this unreasonably hard. I always feel slightly embarrassed watching what people have to do to hoodwink the game into letting them do so.
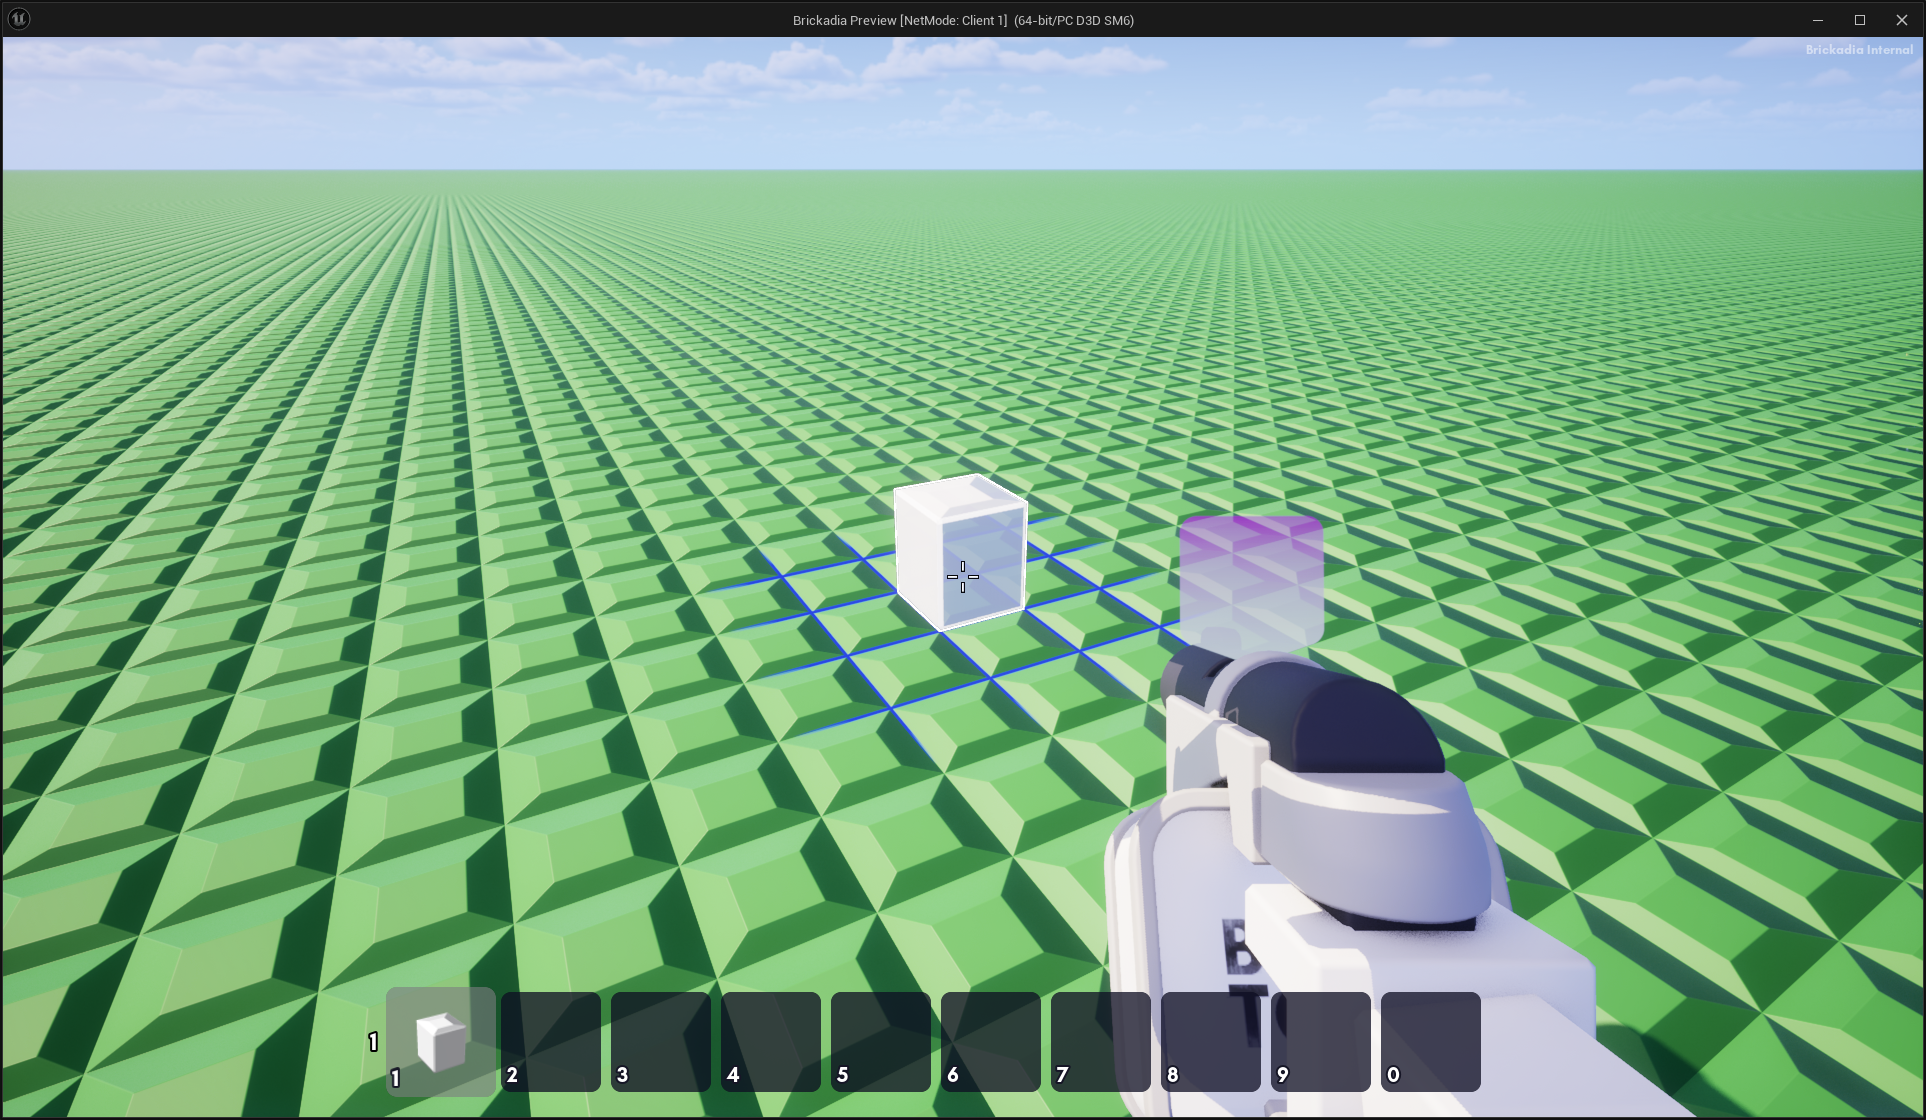
To explain, let's say I want to start building an airship here:

My best options are:
- Aiming at some wall on the ground, plane locking and aiming up (the fastest way, but don't tell the mouse mode haters).
- Going into orbit mode on the ground and holding the "move up" button for an obnoxiously long time.
- Going into detached mode on the ground and holding the "move up" button for an obnoxiously long time.
You should just be able to position bricks in mid air at a set distance from your face. It should work like this: if you hold a 'float' key while in mouse mode, your ghost brick starts hovering at its current distance. If you're aiming at something too far away (like the sky), it will hover at a preset default distance instead.
More Extensibility Desired
This final new requirement is that the building system should be implemented in a modular way. That means the core Placer code should do very little, almost all functionality should be inside modes which are added on to it.
We currently have three types of modes:
Control Modes will implement the UX for handling user input and displaying output on the HUD. They will register a set of control hints to display on screen and can show or hide them from the HUD at any time.
We will continue to have three: Mouse, Orbit, and Detached mode. Implementing them as entire separate modes allows us to implement each mode more robustly as a state machine.
Alignment Modes will decide the behavior of the placement grid in all cases. At present, we have Plate, Half, Fifth, Tenth, and Brick.
Later we might add new alignment modes, or better yet, let the player define their own alignment grids for certain building styles like cube terrain.
And finally, Placement Modes will decide placement behavior. At present, we have Resize-Drag and the old Row-Drag.
Future placement modes could include a Circle-Drag or Frame-Drag. The way the system is designed will make it easy to extend, and all placement modes will work in all control modes.
We have our work cut out for us. Time to rewrite the whole building system!
Rewrite the whole building system??
There are many reasons we chose to rewrite the building mechanics in this case, even though we want to release the game some time this year still:
- The code for both the old inventory and building systems is almost entirely written in Blueprint prototypes (Unreal Engine's artist targeted visual scripting language), because we didn't really know what we were doing back then. Over the years this turned into literal spaghetti code, Blueprints are incredibly slow to refactor, cannot merge or version properly because of binary files, and there are no good tools to edit them other than Unreal's very clunky editor.
- There are now special bricks and other objects such as physics joints that you can place. Many of them need custom placement behavior. With the old Blueprint code, this was impossible to do in a reasonable way because the code is highly specialized to ordinary bricks.
- Important parts of the inventory system's "state", such as the brick inventory in its entirety and the current selected slot, were stored entirely client-side. This meant the server could never do things like know what bricks you have or what you have selected. This prevented us from implementing many long-desired features such as letting you put prefabs from the Gallery (more on that in later posts) in your quickbar.
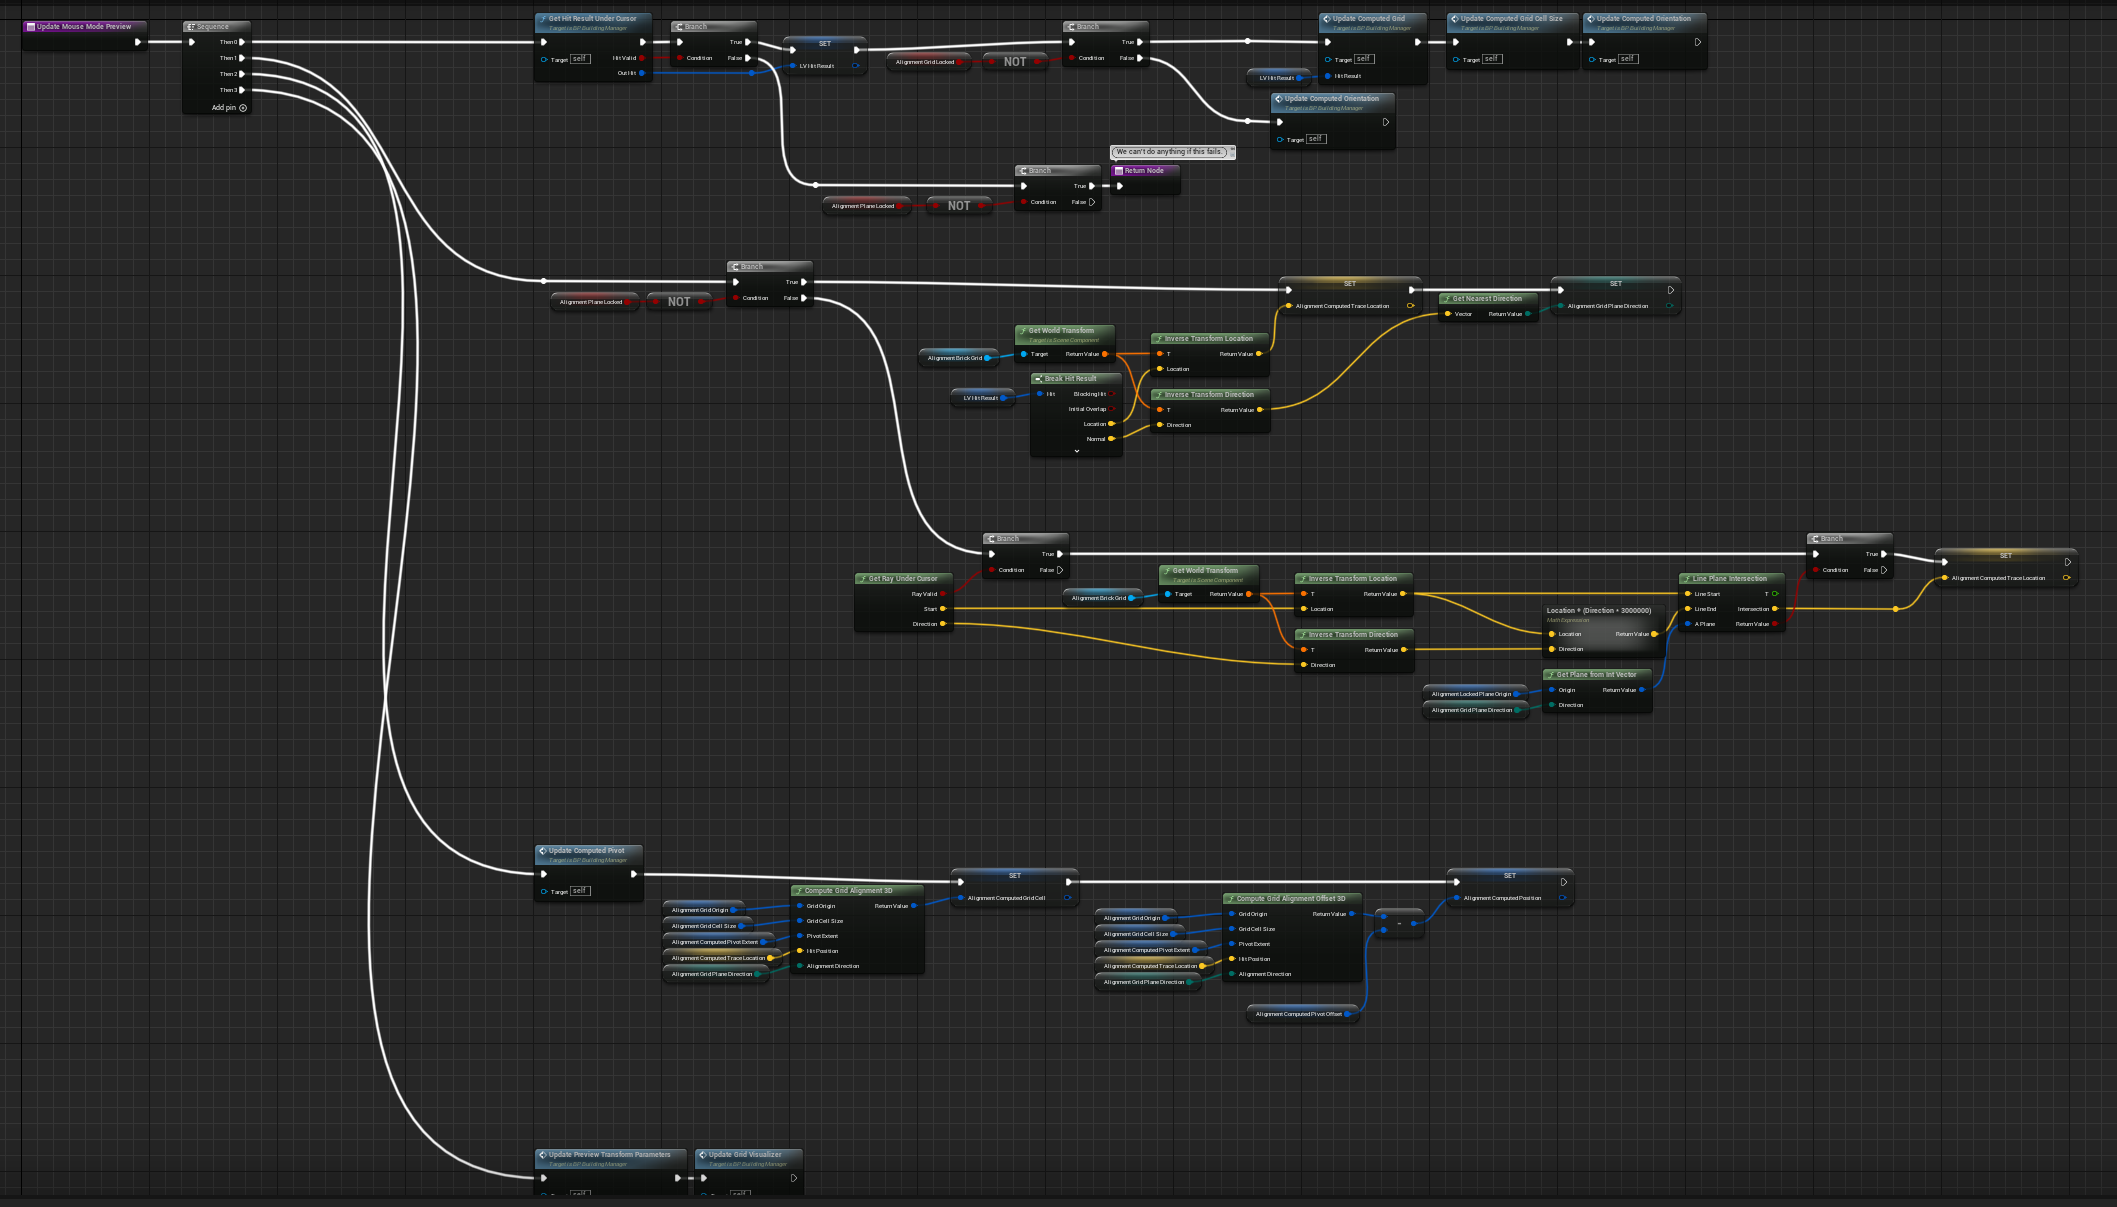
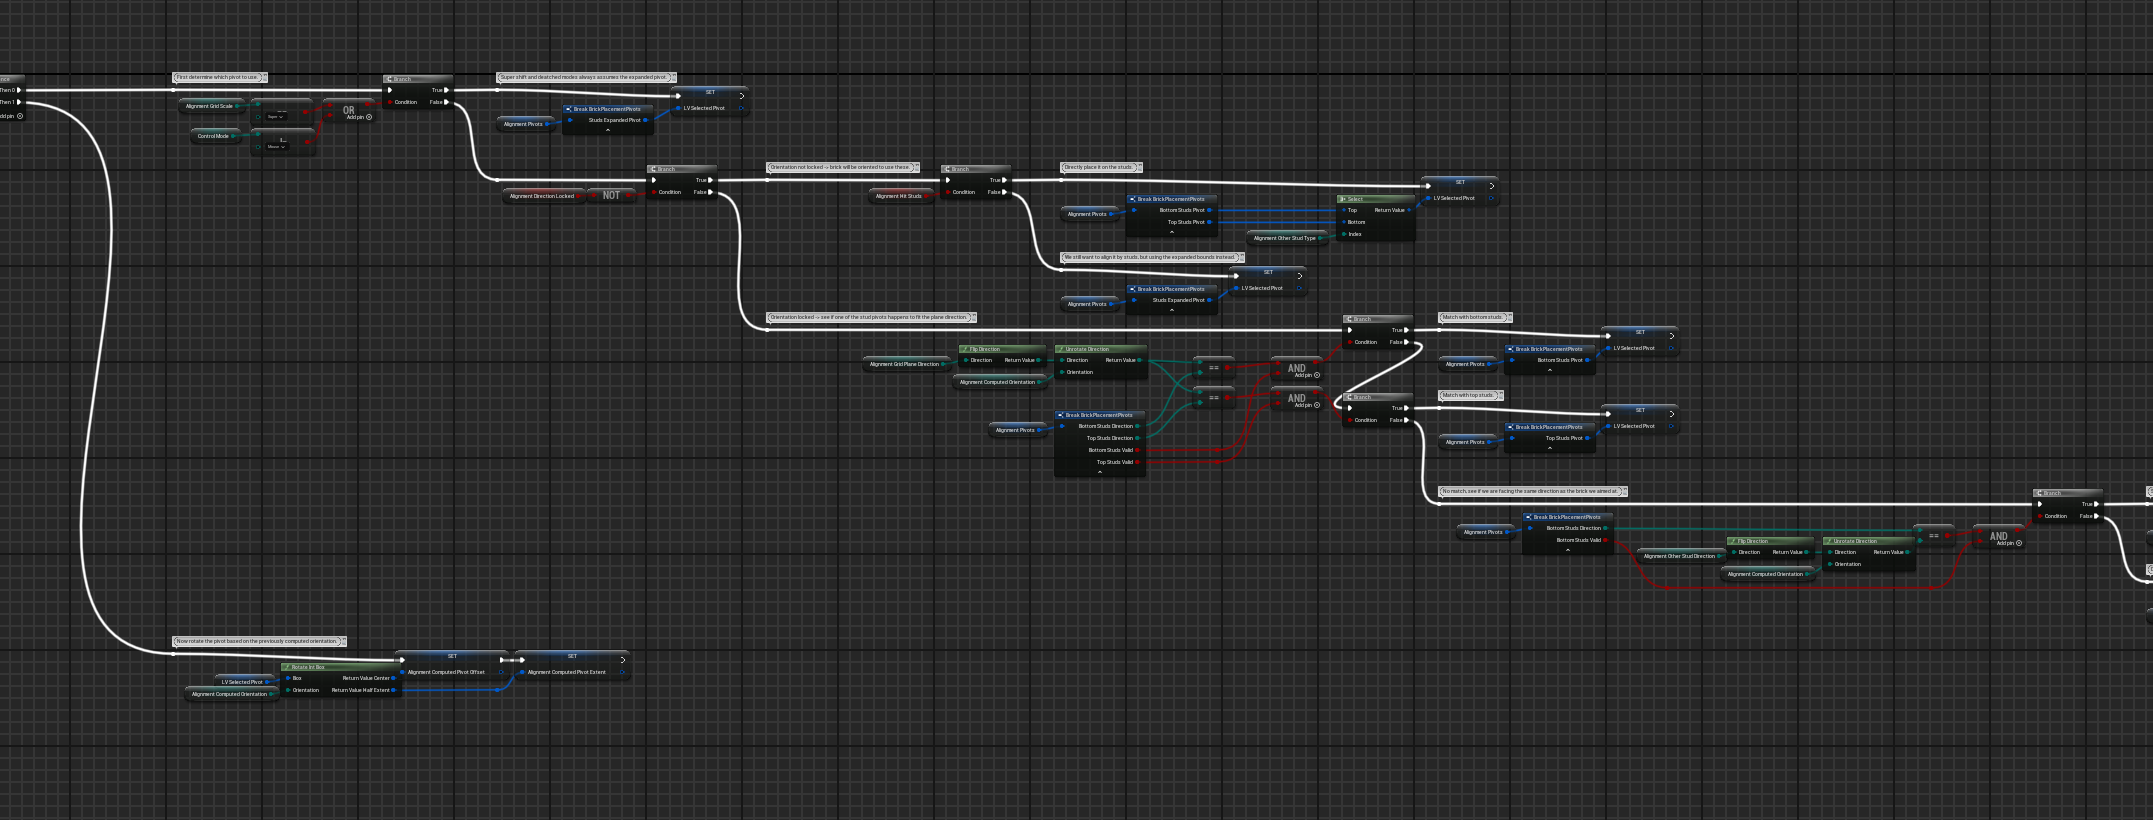
- There was no modularity or real separation of the control modes (mouse, orbit, detached) and shared behaviors (alignment grid). Everything was either implemented multiple times for each case, or done by a shared function that had to be branch-heavy to the point of unreadability because of all the special cases. Nobody knows what parts you'd have to change to do X! And even if someone did...
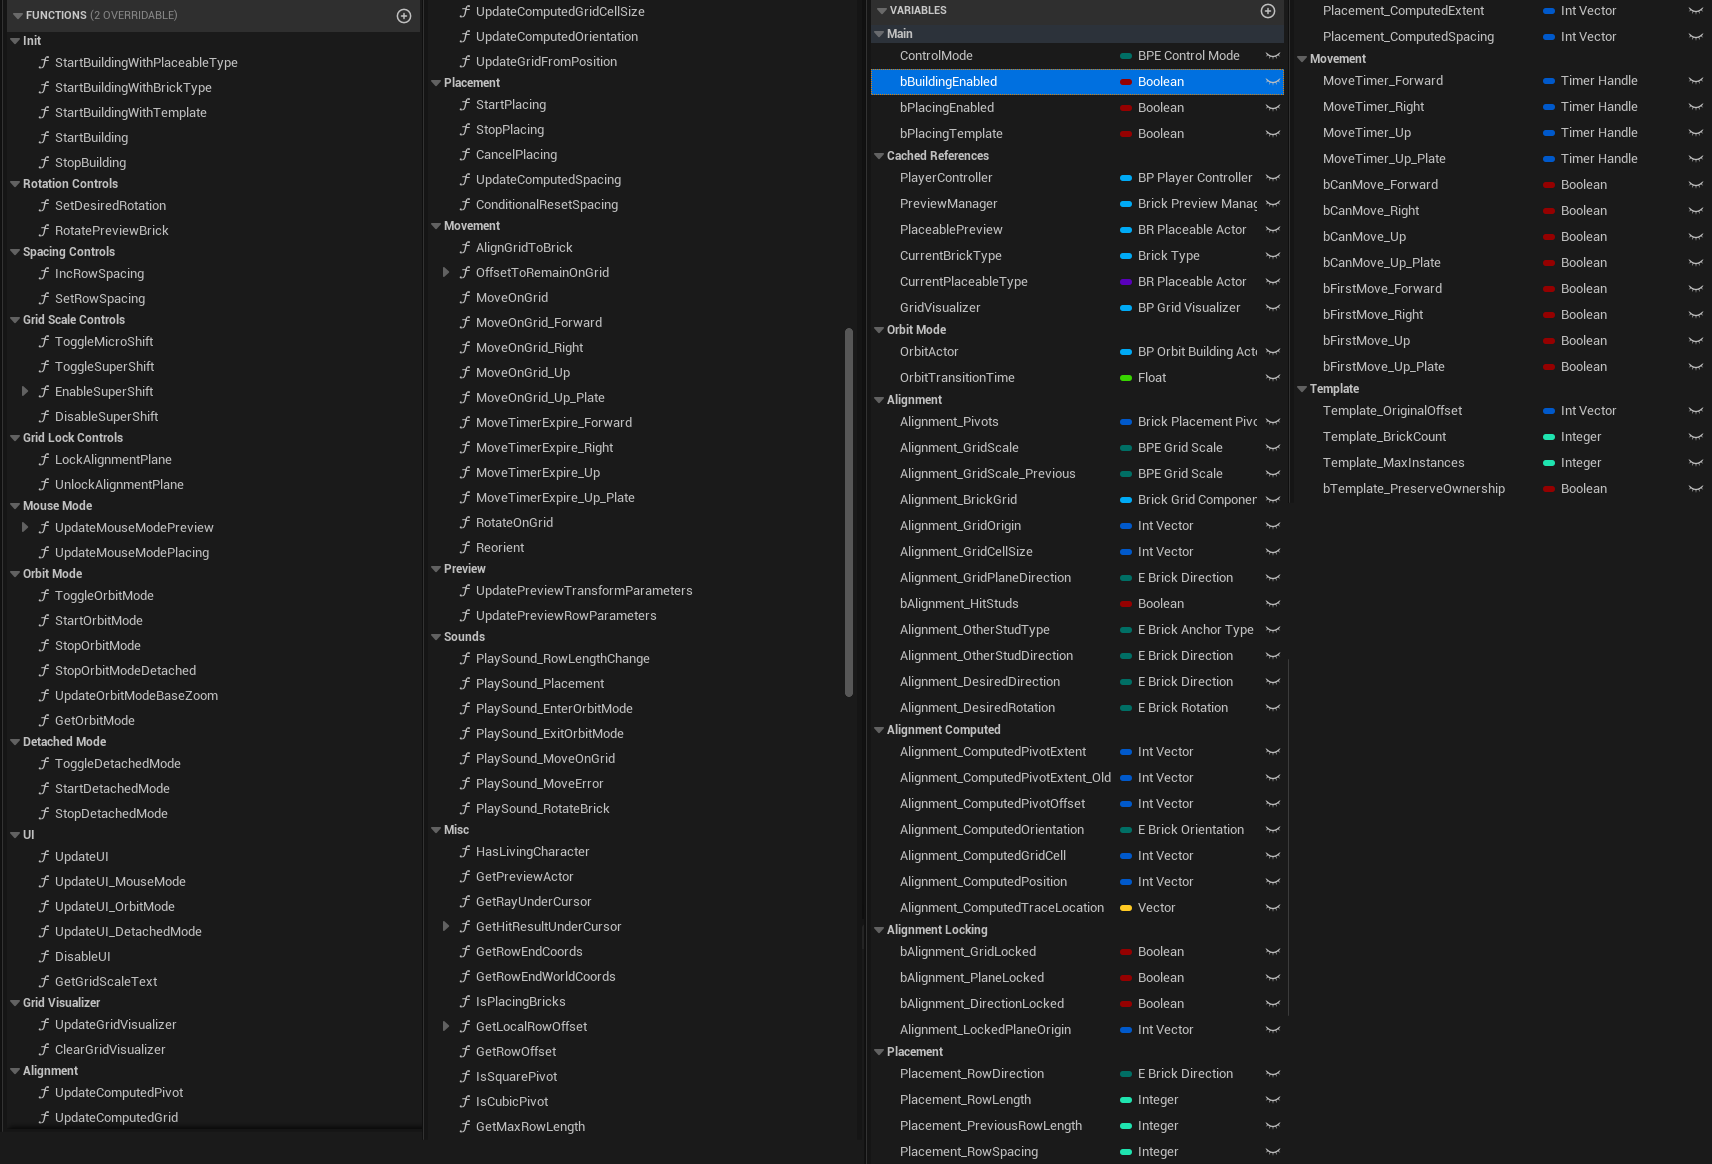
- The blueprints were impossible to navigate and maintain, because there were so many functions and variables, and you can only view one at a time:
Why didn't we just buckle down and try extending this rather than a rewrite? Well, we sort of did, but it quickly became obvious it wasn't the way to go.
If you've been following the project for a while, you may have seen the recent Ferris wheel video in our #dev-media Discord channel, and the not-so-recent Physics Trailer. Those were made with prototype tools that were created by modifying (bodging) the building manger. And those prototype tools were not very good.
Here's me trying to build the Ferris wheel with them again, as a demonstration of how terrible it was the first time:
All the problems worked together to make the prototype UX this bad. It was slow for Zeblote to work with, and he had to really fight the fact that the building manager is written only for bricks, and has spaghetti-like code that is essentially working for every one of the neatly separated "modes" we designed above at once. Even if it were fully written in C++, this would have been very tiresome and resulted in wiping out most of the original code either way.
At the end of the day, addressing this kind of technical debt is something that just can't wait.
So let's get it done!
Upgrading the Inventory
Firstly, you will often see me use the expression "the inventory". But in Brickadia, at least in the Open Alpha, you really had three inventories: the Item Inventory, the Brick Inventory (client side only), and the Tool Inventory.
The Item Inventory lives on your character. It defines what appears in the quickbar, and in Alpha 5 it can only contain items. Because the character inventory lives on your character, it's fully lost when you die.

The Brick Inventory holds all the bricks you want to build with.
This inventory has a special extra slot in it called the TEMP slot. Something can be held in it temporarily, until you switch to another slot, at which point the TEMP slot is destroyed. This was mainly used for picking bricks from the world.
The Tool Inventory lives on your player controller, which can be seen as the "soul" that inhabits characters you control in Brickadia. Unlike the character, it's not recreated when you respawn - it's created once when you join a game, and deleted only when you leave. In addition, the tool inventory being here means you don't lose your tools when your character dies - they're kept.
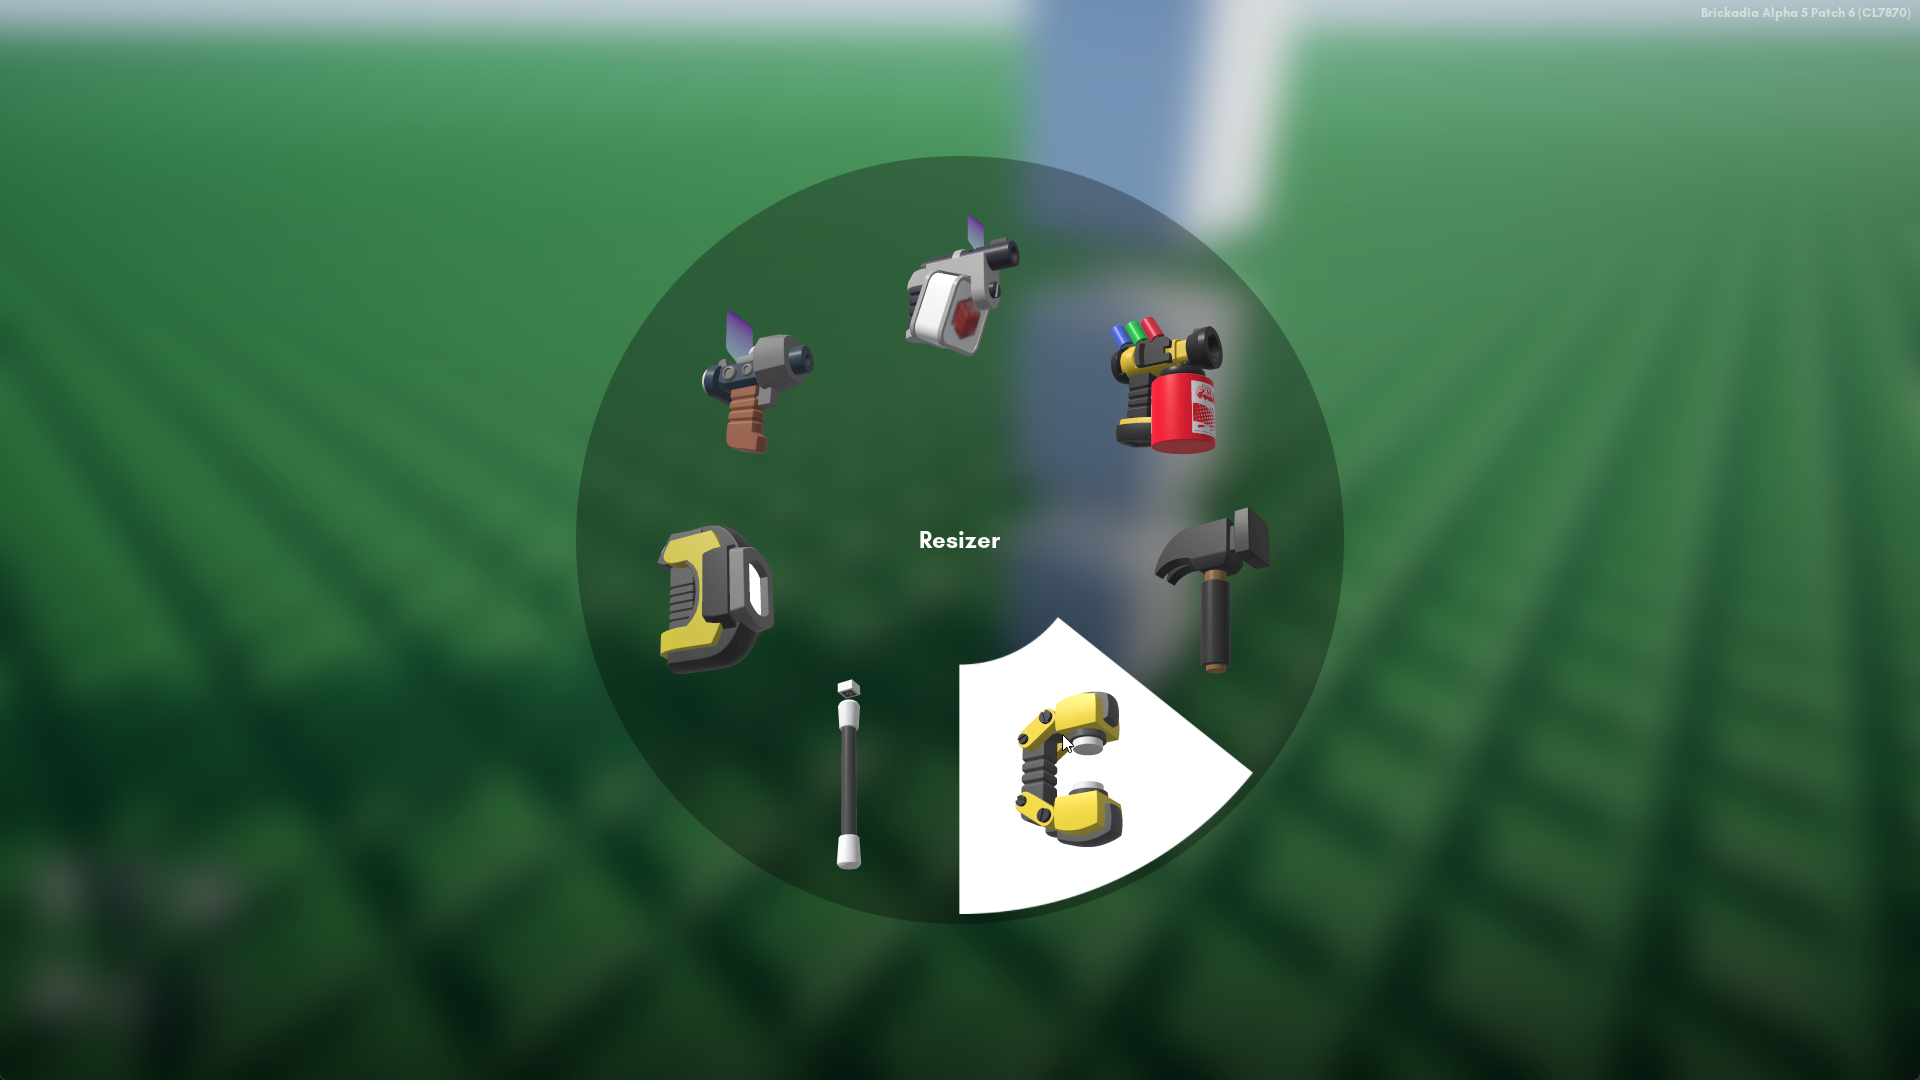
We display the tool inventory via the tool pie menu:
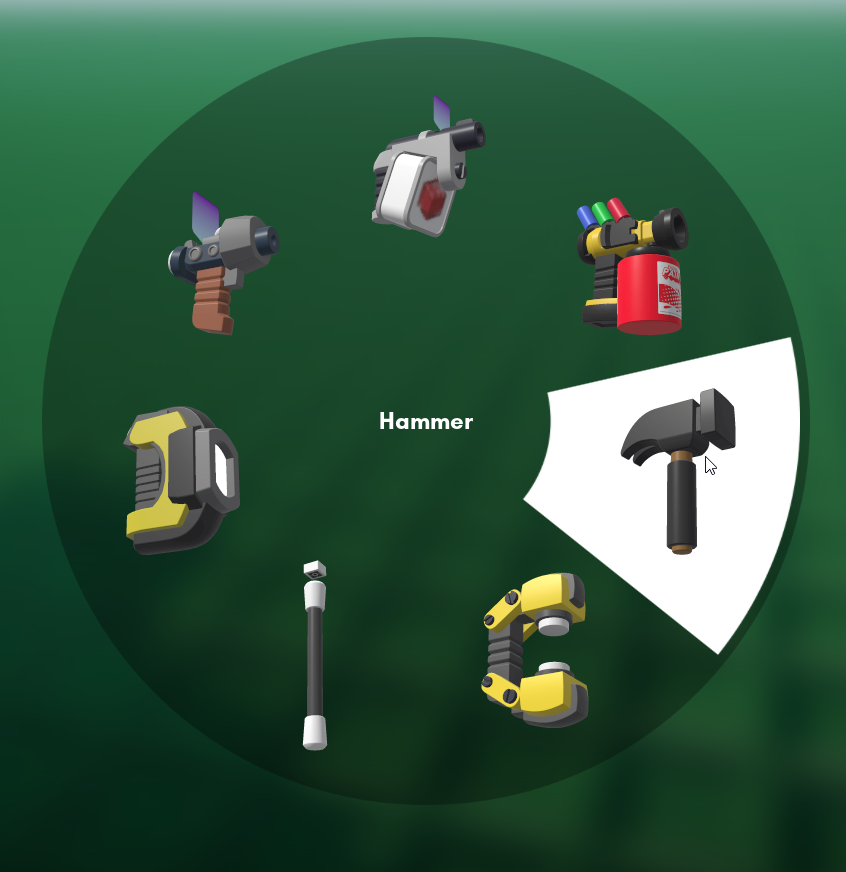
The tool inventory can technically be edited by game modes, which will change what's in the pie menu! There's no particular reason it can't contain guns or, in the case of our new inventory changes, bricks. We just haven't added a way to do so.
Extensible Inventory Slots
In Alpha 5, inventory entries always store references to item actors. The game spawns item actors in the world when they are added to someone's inventory and hides them under the map until they're held, at which point it welds them to that player's hand(s) and plays any relevant animations.
We can visualise that inventory design like this:

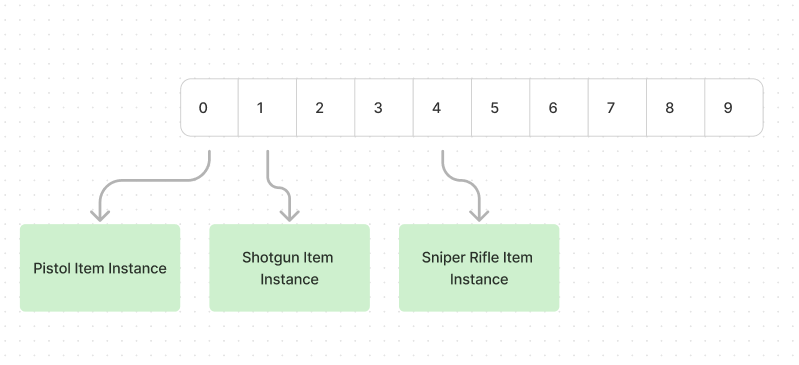
You will notice it seems like this can't support bricks, even though we had a Brick Inventory in Alpha 5. That's exactly right! Alpha 5 only works because the Brick Inventory in Alpha 5 isn't real. It's a bunch of Blueprint hell where we create 11 widgets and store a brick reference on each one, and the UI widget calls a function on the building manager to change the current brick being placed. Which means the server has no idea, or authority over, what bricks you have!
The first thing we are going to do to fix this is throw out this separate, "fake" Brick Inventory and merge it into the Character Inventory. To do that we'll need to adapt our inventory to store bricks in it, which means we need a layer of indirection between the inventory and the different things you can store in it. Like this:
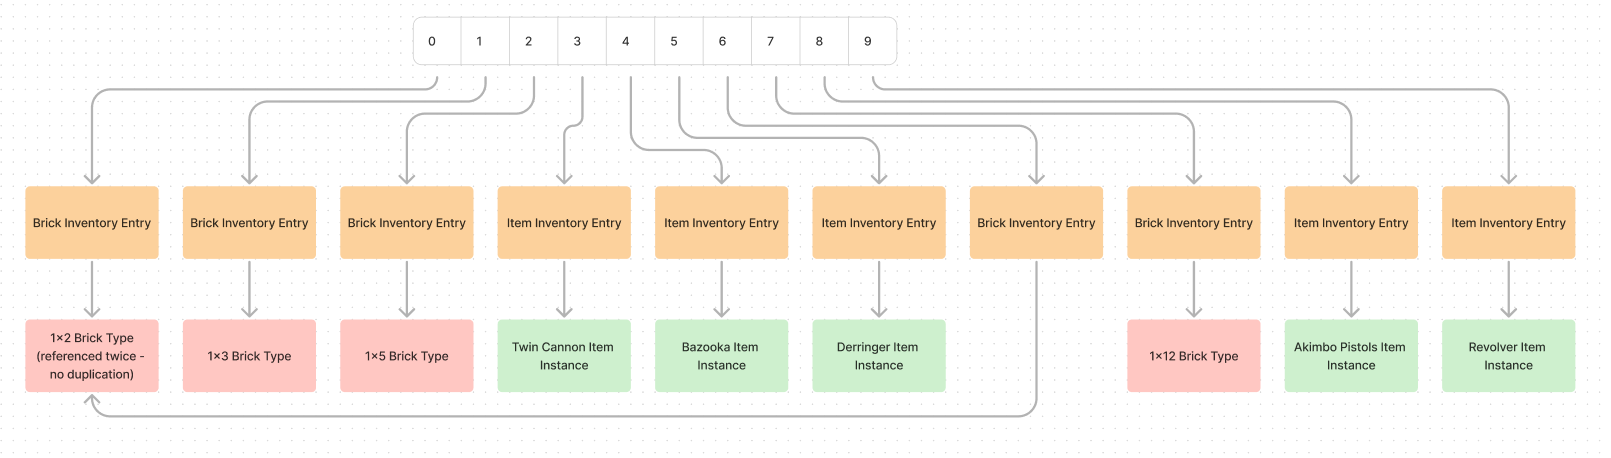
Entries point to an item that should be put in the player's hand when that entry is selected. As selecting a brick still needs to put the placer in your hand, we'll do something broadly the same as what A5 did - we'll create a placer instance with every player that joins the server, and put it in their hand when they have any brick selected in the quickbar.
More Inventory Space
Currently, our quickbar widget can only ever view the first 10 slots of the inventory - adding more doesn't work. But we can upgrade it to view specific ranges instead.
Here's what we do: When the widget is initialized, it takes the total inventory size and divides it by 10 to compute the quickbar count (i.e. 10). Now, you can switch between quickbars in order by CTRL-scrolling:
Or, you can press CTRL-[0-9] to go directly to a specific quickbar:
Keeping your Character Inventory
Doing all this has foregrounded an issue that already existed and was quite annoying in Brickadia's creative mode - when you die, either by physics damage or self destructing for a joke, your character inventory is cleared. The new problem? This now clears all the bricks in your inventory, too.
To fix this, I've added one more new feature: Keep Inventory. If you are in a minigame where this is on, or if you are not in a minigame at all, this feature will cause your inventory to be copied to your new character when you die. This means you don't lose your bricks, or any guns you spawned in for fun.
Selecting Inventory Slots
This mostly only exists for historical reasons at this point, but it seemed like an interesting tidbit nonetheless. When we were setting up the inventory system years ago, we wanted client side prediction for switching and firing weapons.
That meant the slot selection had to be routed through the character movement component in Unreal Engine. This wasn't easily extensible, but we had one free byte that could be used.
How do we select something out of two inventories and a TEMP slot using a single byte? Simple, we encode the current inventory selection in an int8 - a signed integer with 256 possible values, ranging from -128 to 127 - which we call an inventory index. We map inventory slots to the index like this:
- 0 is a special case. It means the player sending this index is not holding anything from any inventory.
- -1 is a special case. It means the player sending this index is holding whatever is in the TEMP slot.
- 1 to 100 select inventory items from the character inventory - you can get the index of the item in the character inventory by subtracting 1.
- -2 to -101 to select inventory items from the tool inventory - you can get the index of the item in the character inventory by removing the sign, then subtracting 2.

This fits 126 entries in each inventory, of which we'll only use 100.
Upgrading Building
Building has now been mostly rewritten in C++. It's nicely modularized and much easier to extend and debug. Here are the cliff notes of how it works!
The Core
With a lot of checking back to the building manager, I started by making the Placer's core - its state machine for the control mode, as well as selection for the alignment and placement modes.
Things that work exactly the same way in every mode can be implemented on the Placer itself, so we'll implement the controls to switch between placement and alignment modes here. C switches alignment mode, J switches placement mode. Holding C selects the special "super" alignment mode.
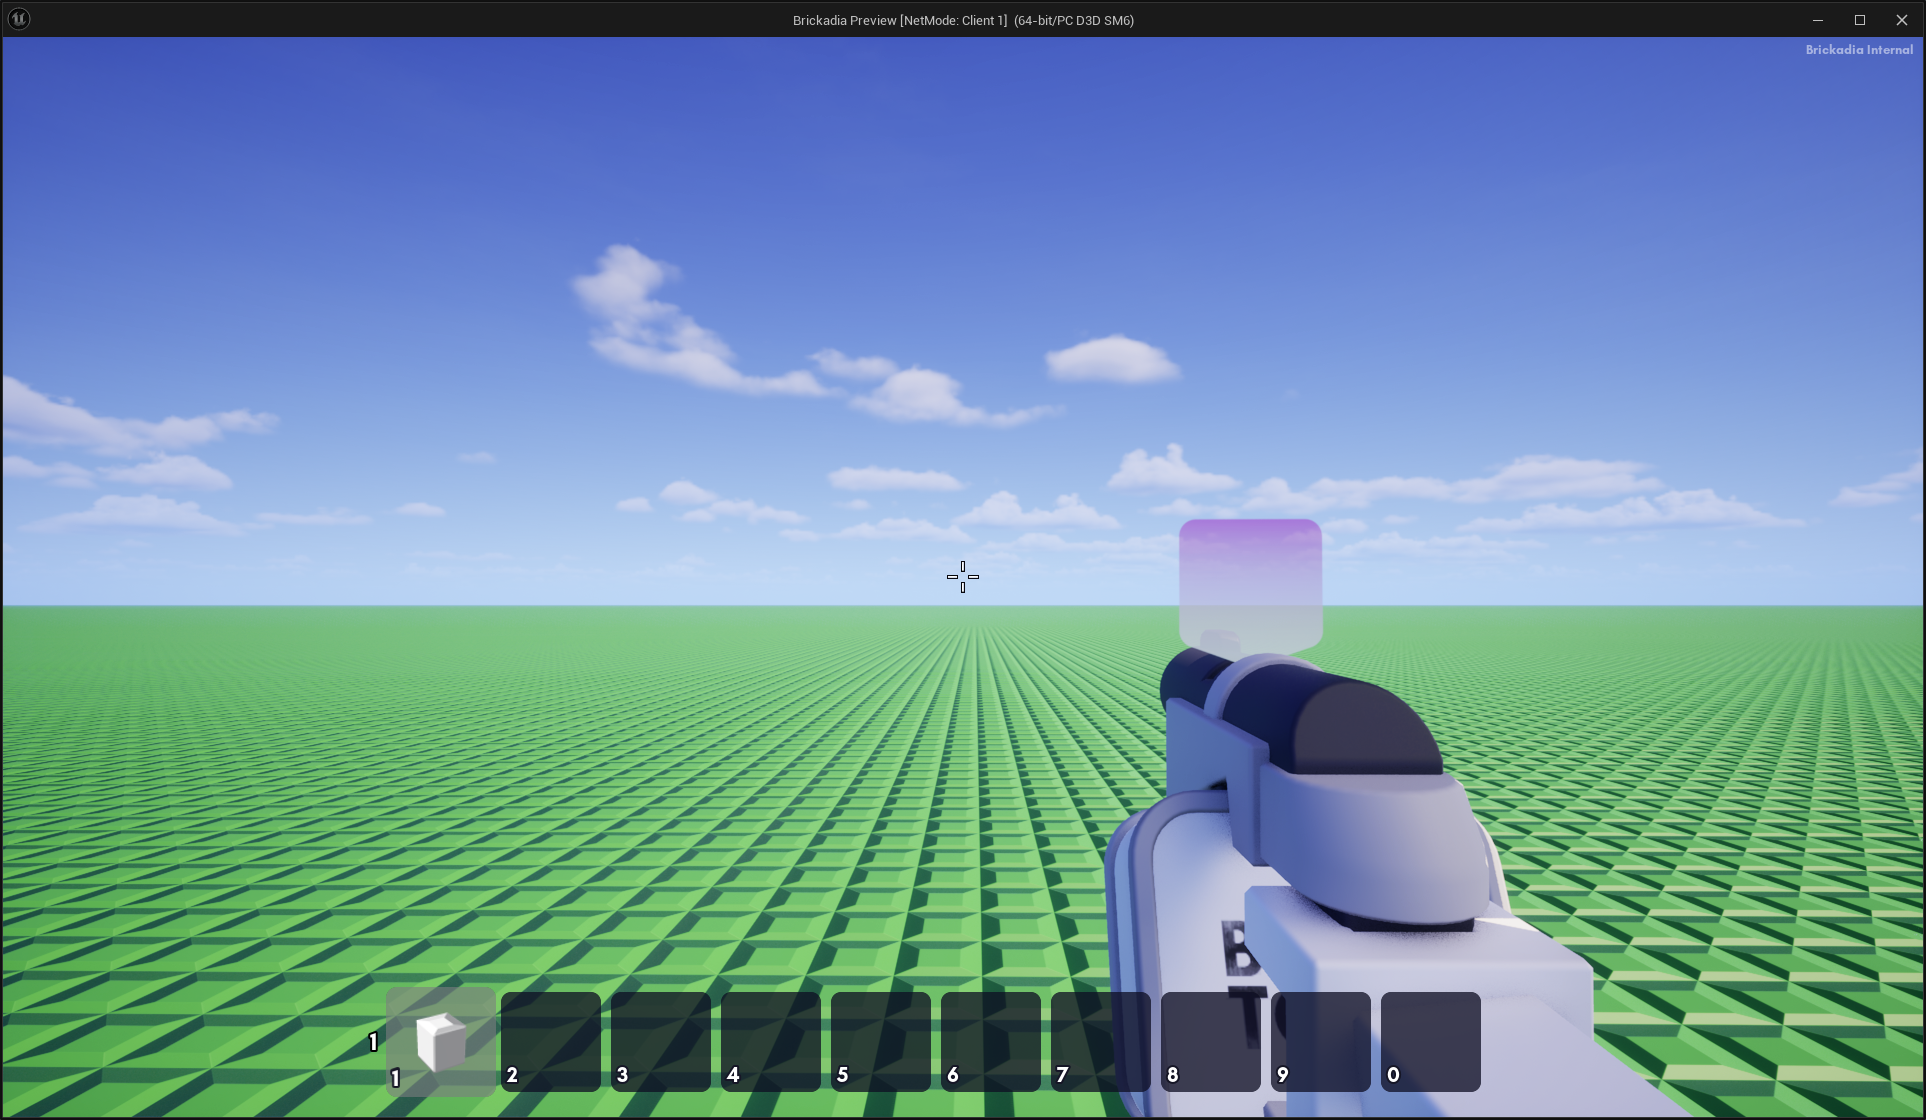
Of course, even though you can select bricks from the Quickbar, you can't actually place a brick yet at all. Or see anything happening when you swap the modes. We're about to get to that. Starting with...
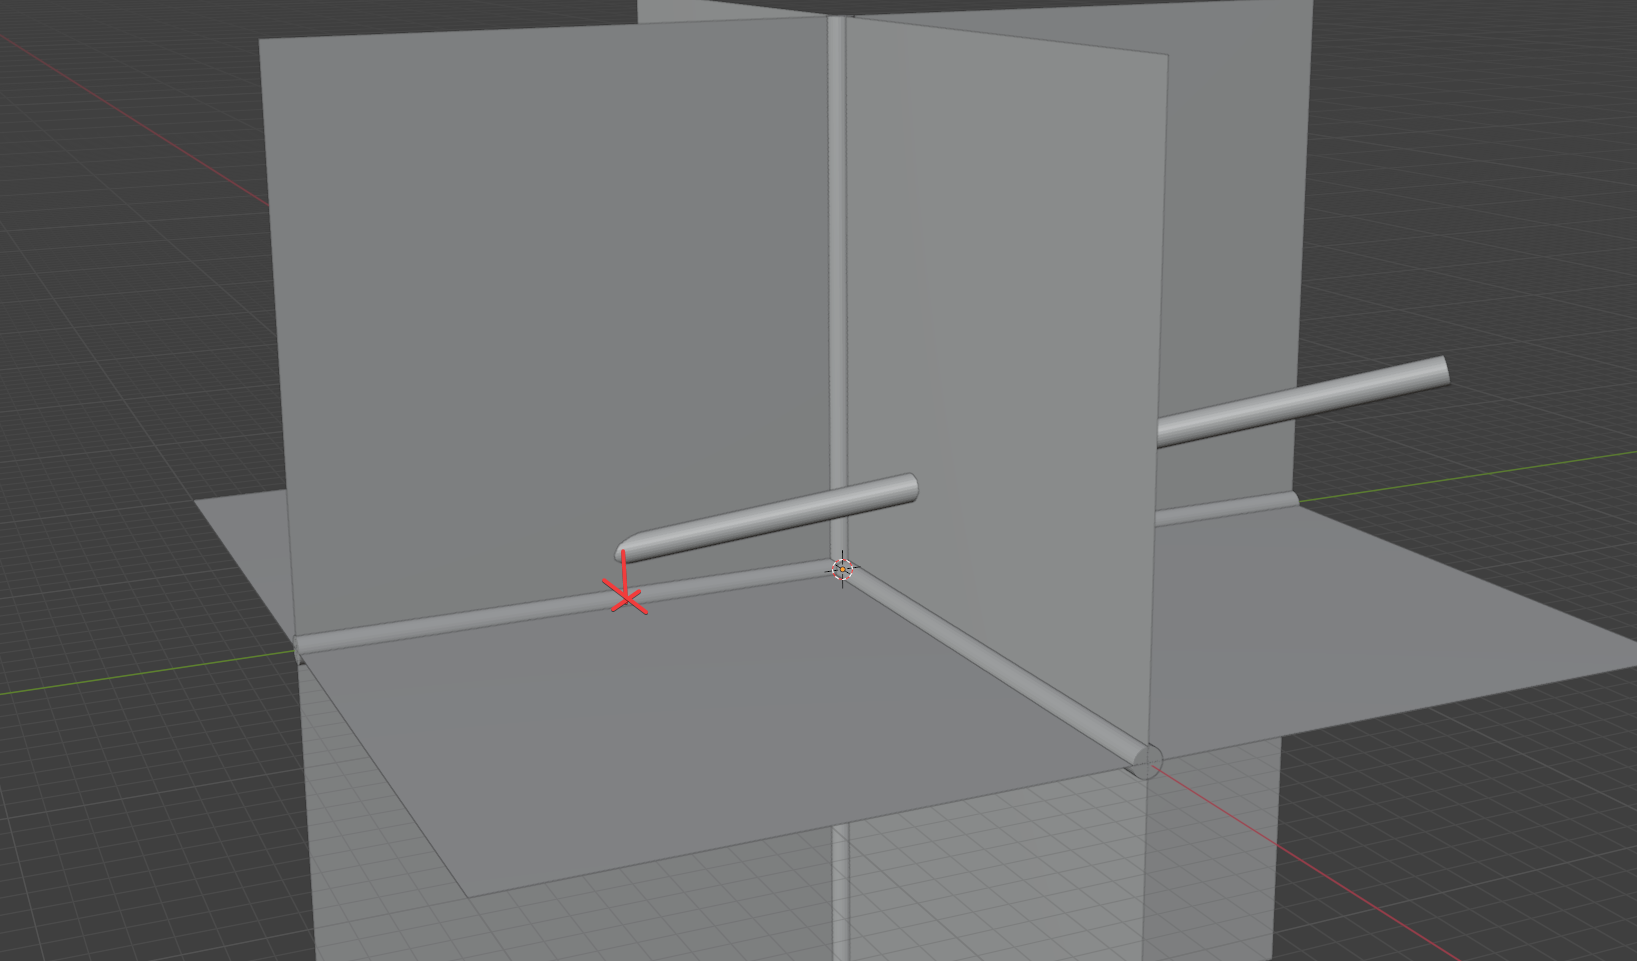
Aligning Bricks with the Mouse
The second most complicated part of building is the code that uses the position of your mouse to determine where the brick you're aiming should go. It seems trivial but it's not. The tool trace hit position must be resolved into a brick placement location, where:
- The resulting placement must be positioned on the grid that was intersected, or if none the global brick grid (and the placement preview should parent itself to that brick grid, so there's no jittering if that grid is a moving vehicle);
- The resulting placement must not be positioned in a way that causes it to intersect the surface it was aimed at;
- The resulting placement must treat hidden or noncollided bricks like regular bricks;
- The resulting placement must respect the placement alignment grid, meaning that the placement's edges must be aligned to a minimum of 3 faces of one of the alignment grid cells it lies inside (which is why bricks smaller than the alignment grid align themselves to corners);
- That alignment grid's origin and oriented cell size must first be resolved from considering the orientation of any hit anchors (such as studs or stud inlets) or else the orientation of the surface on the brick that was hit by our raycast - i.e. if you aim at the side of a reoriented brick, or a stud grid, you get a rotated alignment grid;
- The resulting placement should also orient itself to any anchors (such as studs or stud inlets) unless a specific direction is requested - i.e if you aim at side studs and you haven't manually set your direction, your brick should turn sideways to place on it, and;
- The specified user rotation, and, if set, direction, should otherwise always be respected.
In other words, firing the correct raycast given the position of the cursor is the easy part.
How do we tackle this?
Let's start by grabbing a bit of information from our hit result. We'll grab:
- The brick grid we hit, or global if we hit the map.
- The EBrickDirection of any anchor (stud or inlet) we hit, or the global up direction (Z+) if we didn't hit any.
- The type of anchor we hit, or none if we didn't hit one.
We can already compute our alignment grid's origin and cell size from this information combined with our current alignment mode. The origin is the position of any anchor we hit (or the brick grid's position if we didn't hit one), and the cell size is our alignment mode's cell size rotated to our up direction.
We can now snap our brick to some kind of grid and rotate it to anchors' orientation.
But of course, as soon as we try to place something other than a 2x2 micro brick, it's obvious that something is still very wrong - even when we align the placement point to the grid, the brick ends up wrongly positioned.
Positioning the brick properly requires understanding that what we are placing is not a point, but a box with a size. Placing it like that means we can use the box extents to de-penetrate it from the surface we hit and the nearest 3 grid cell faces, which gives us way better results:
And because of what we did before, it'll even rotate to face away from studs or towards inlets.
Unfortunately, it's still a bit difficult to work with. To explain why, let me demonstrate with this extremely long, tall ramp.
This isn't very usable for building with unless I'm placing it on the floor of the map. For most other use cases, like placing them corner to corner, I need the origin to be where the stud inlet is. I need a pivot.
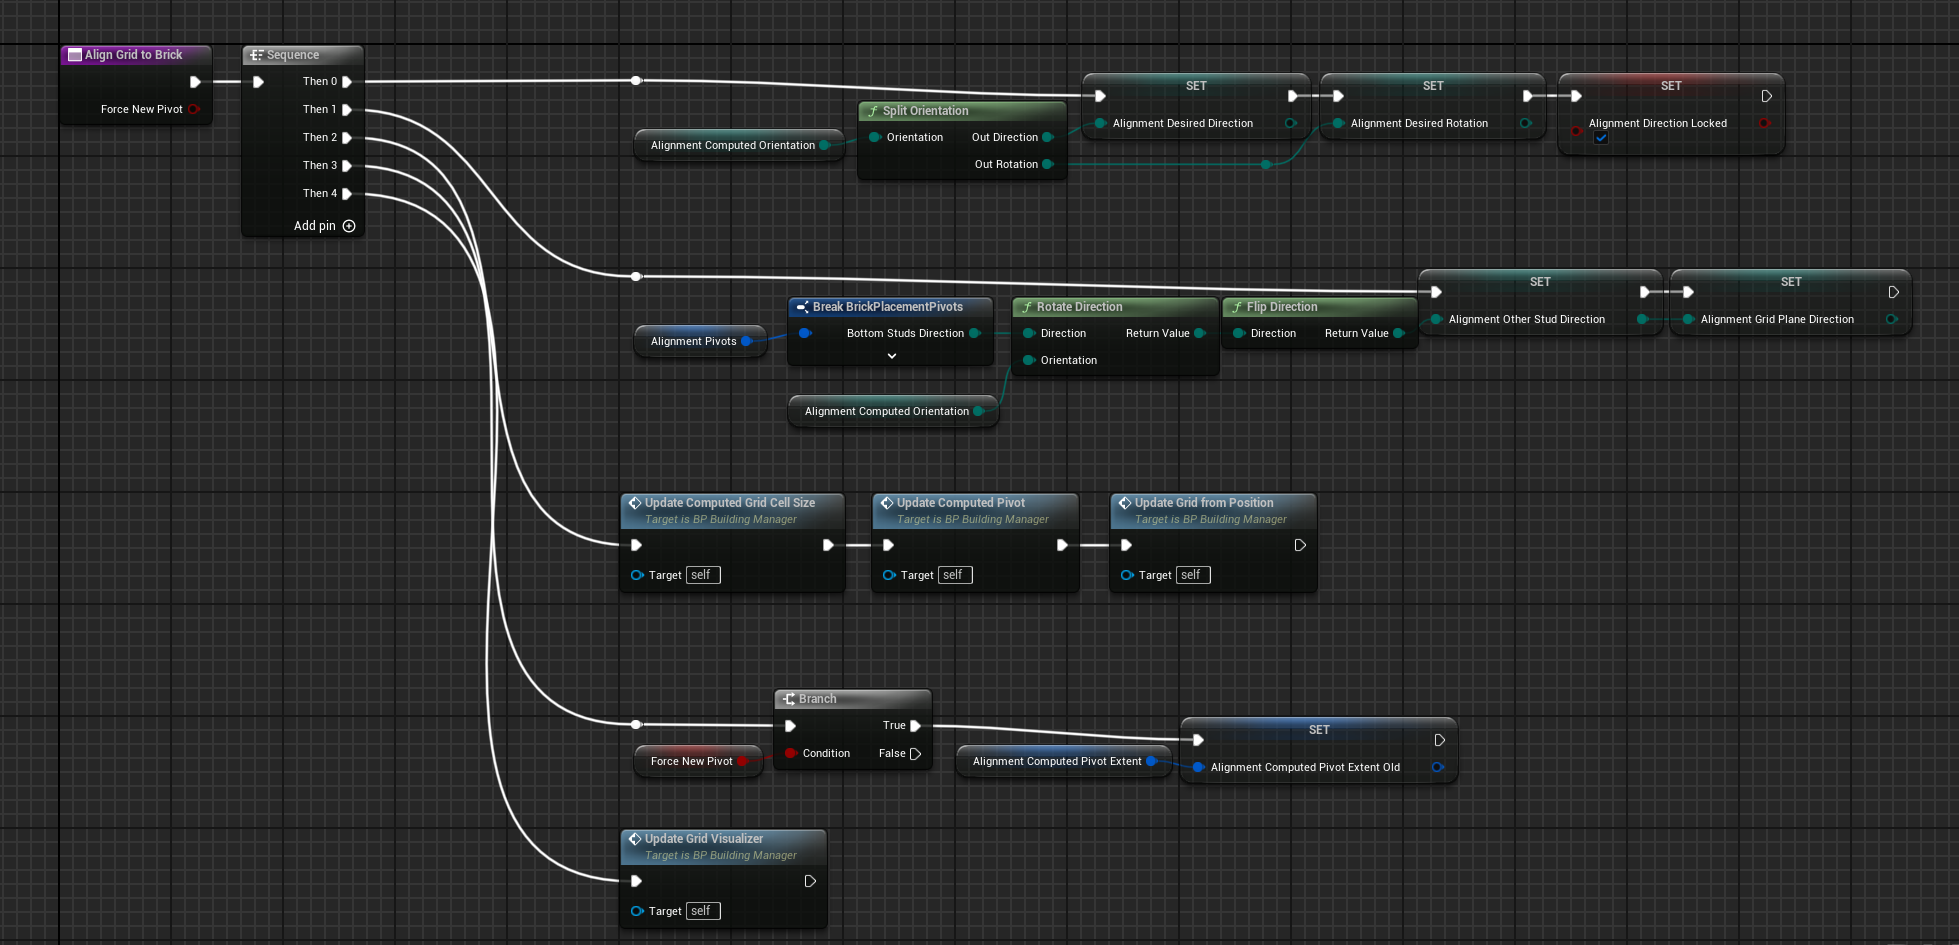
So let's upgrade our size to a full pivot - a box with a relative offset and a size that is calculated within the bounds of the brick being placed. We can use the existing code from the old building system, which per-calculates several of these, and we can choose a pivot to use based on what our ray cast hit. We'll add:
- A "Bottom Studs" pivot, which records the location and size of the first found bottom stud grid. We'll choose this one for aligning to top studs.
- A "Top Studs" pivot, which does the same for the first found top stud grid. We'll choose this one for aligning to bottom studs.
- An "Expanded Studs" pivot, which takes the top studs pivot and expands it to the other end of the brick. We'll choose this one if we're aligning to the side of a brick with our rotation or aligning against the map, since it helps us cull parts of the brick from the placement calculation that are irrelevant.
- A "Bounds" pivot, which when used produces behavior identical to what we were doing before we used pivots - an unmoved bounding box that encapsulates the entire brick. We'll only choose this one if we're aligning to the side of a brick with a different rotation to our previewed one, and we can't reorient to match it. We can also use it for other placement calculations, such as the origin of the brick in the next section.
All sorted!
Knowing where the stud grids are also lets us do stuff like this.
And even if we locked the orientation, we can still line things up relative to the brick being placed on.
Placing Floating Bricks
We wanted a floating placement mode that lets you place your brick in front of your face while holding ALT.
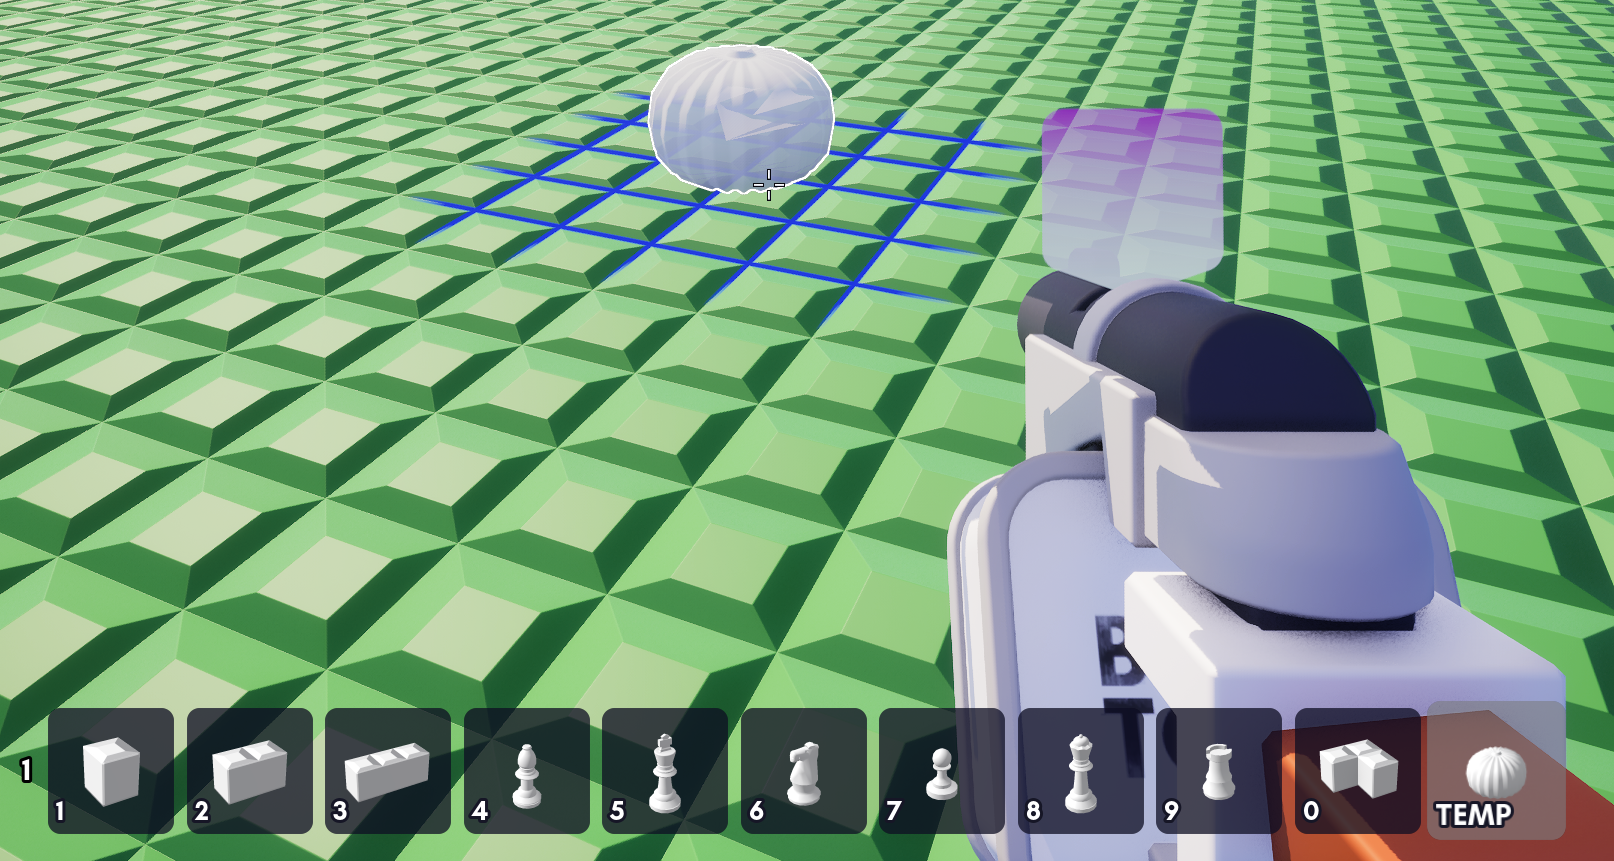
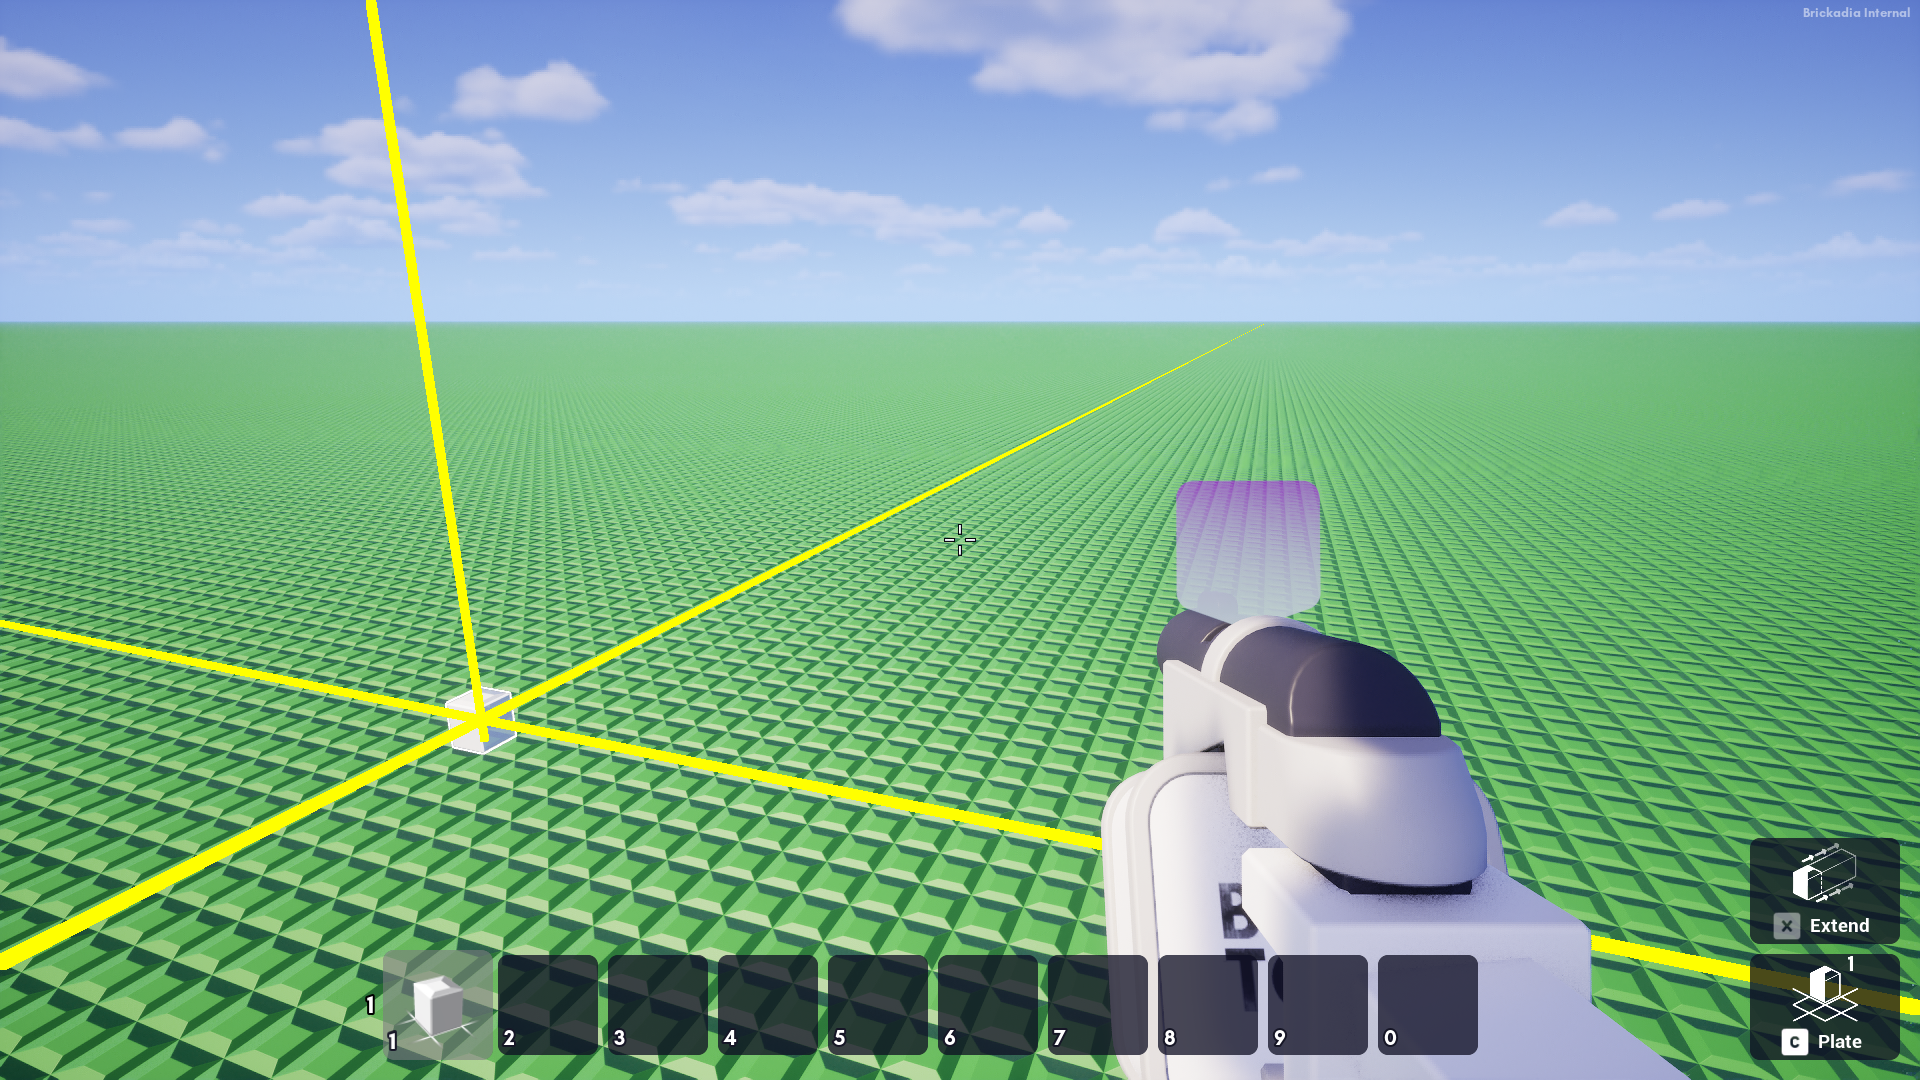
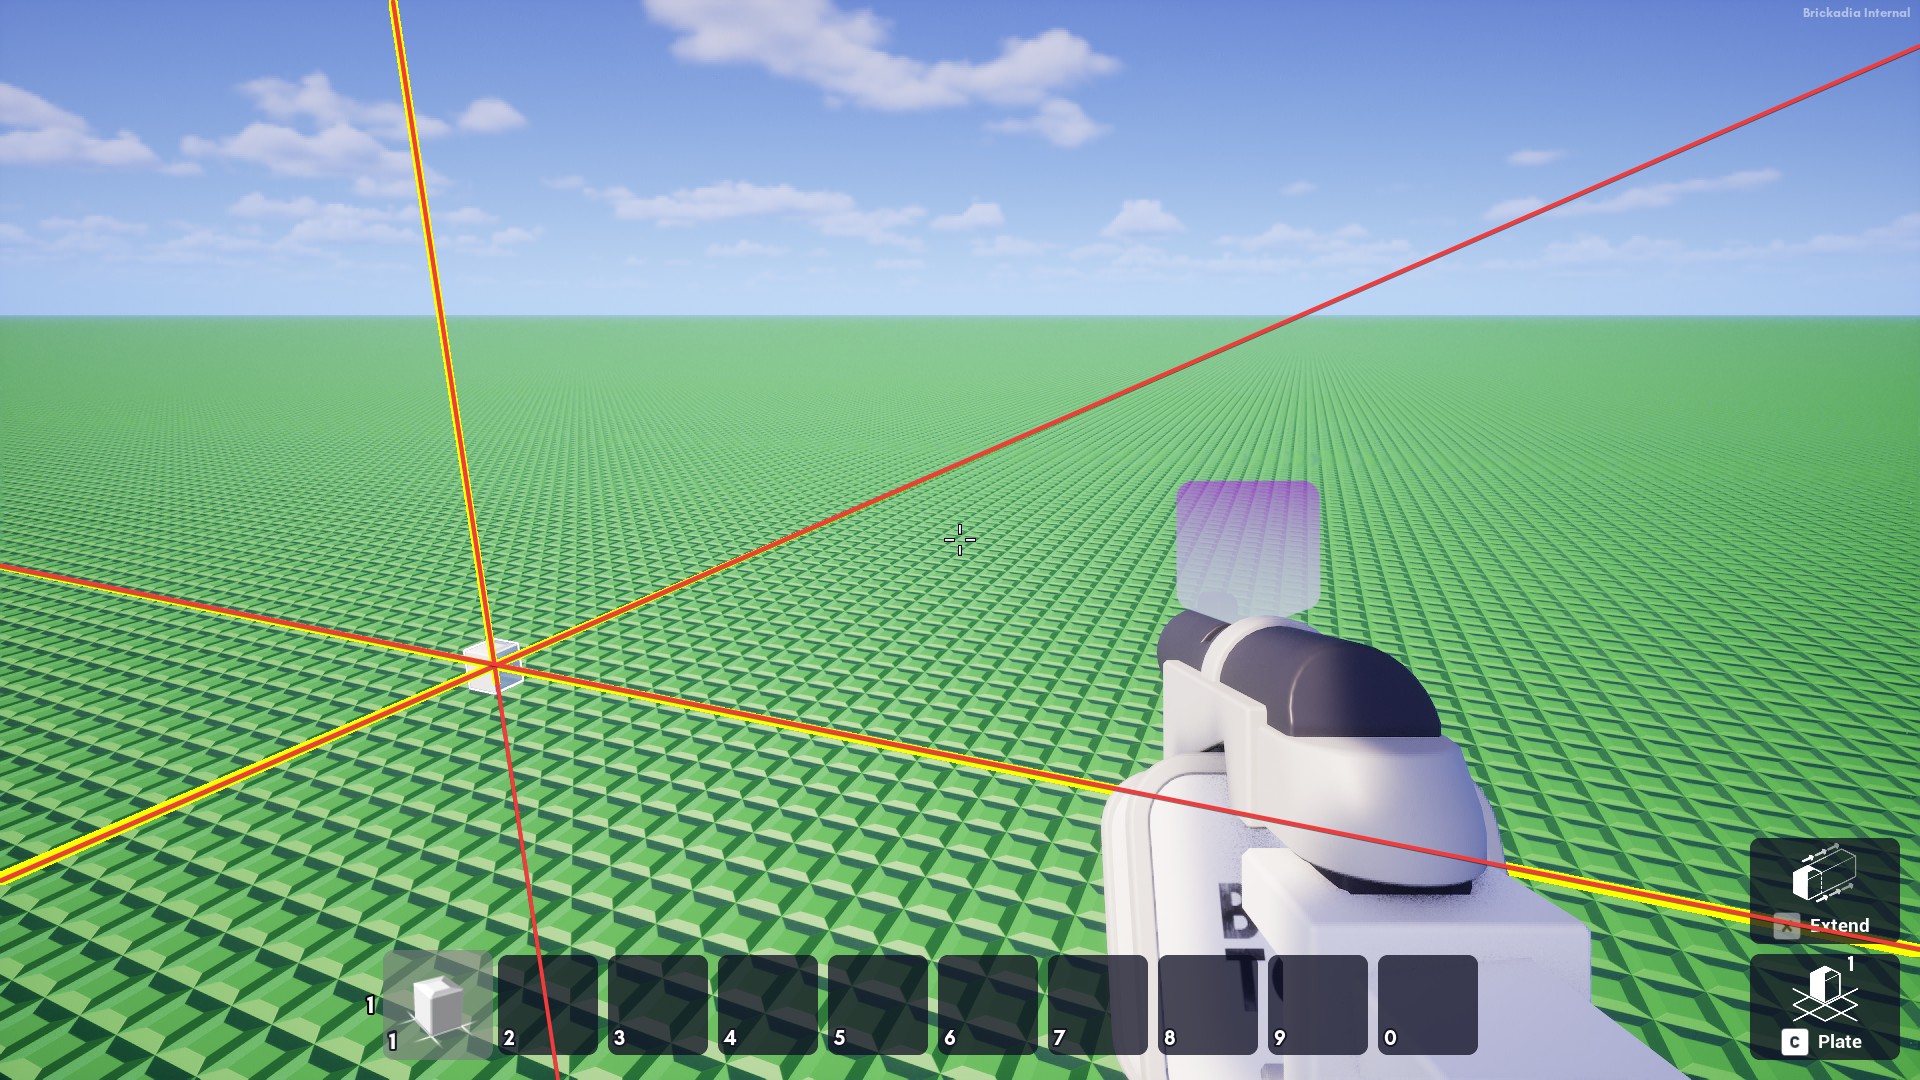
We can do that fairly easily - take the origin and direction of the cursor ray and the distance from it of the current preview brick (or a sensible default distance if there is none) and compute a location. Now, continuously move the brick's origin to the grid cell nearest to that location:
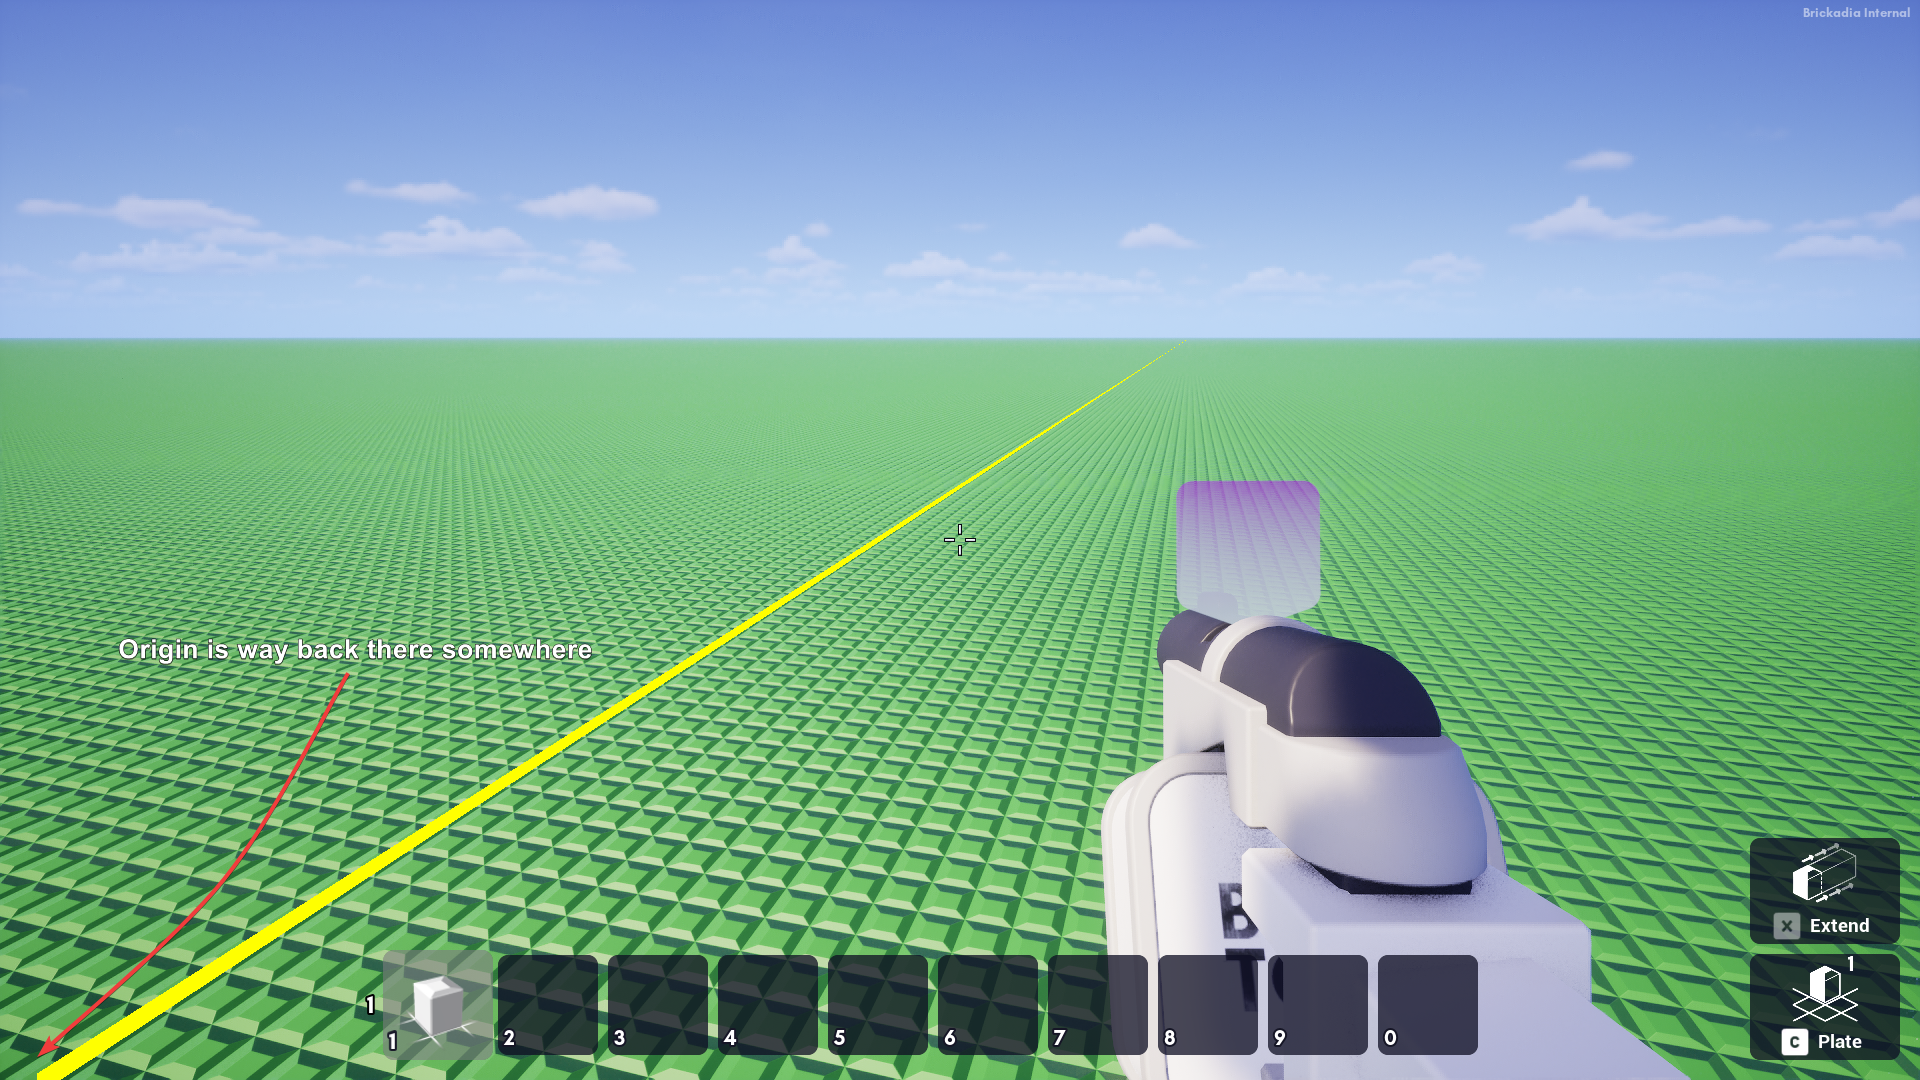
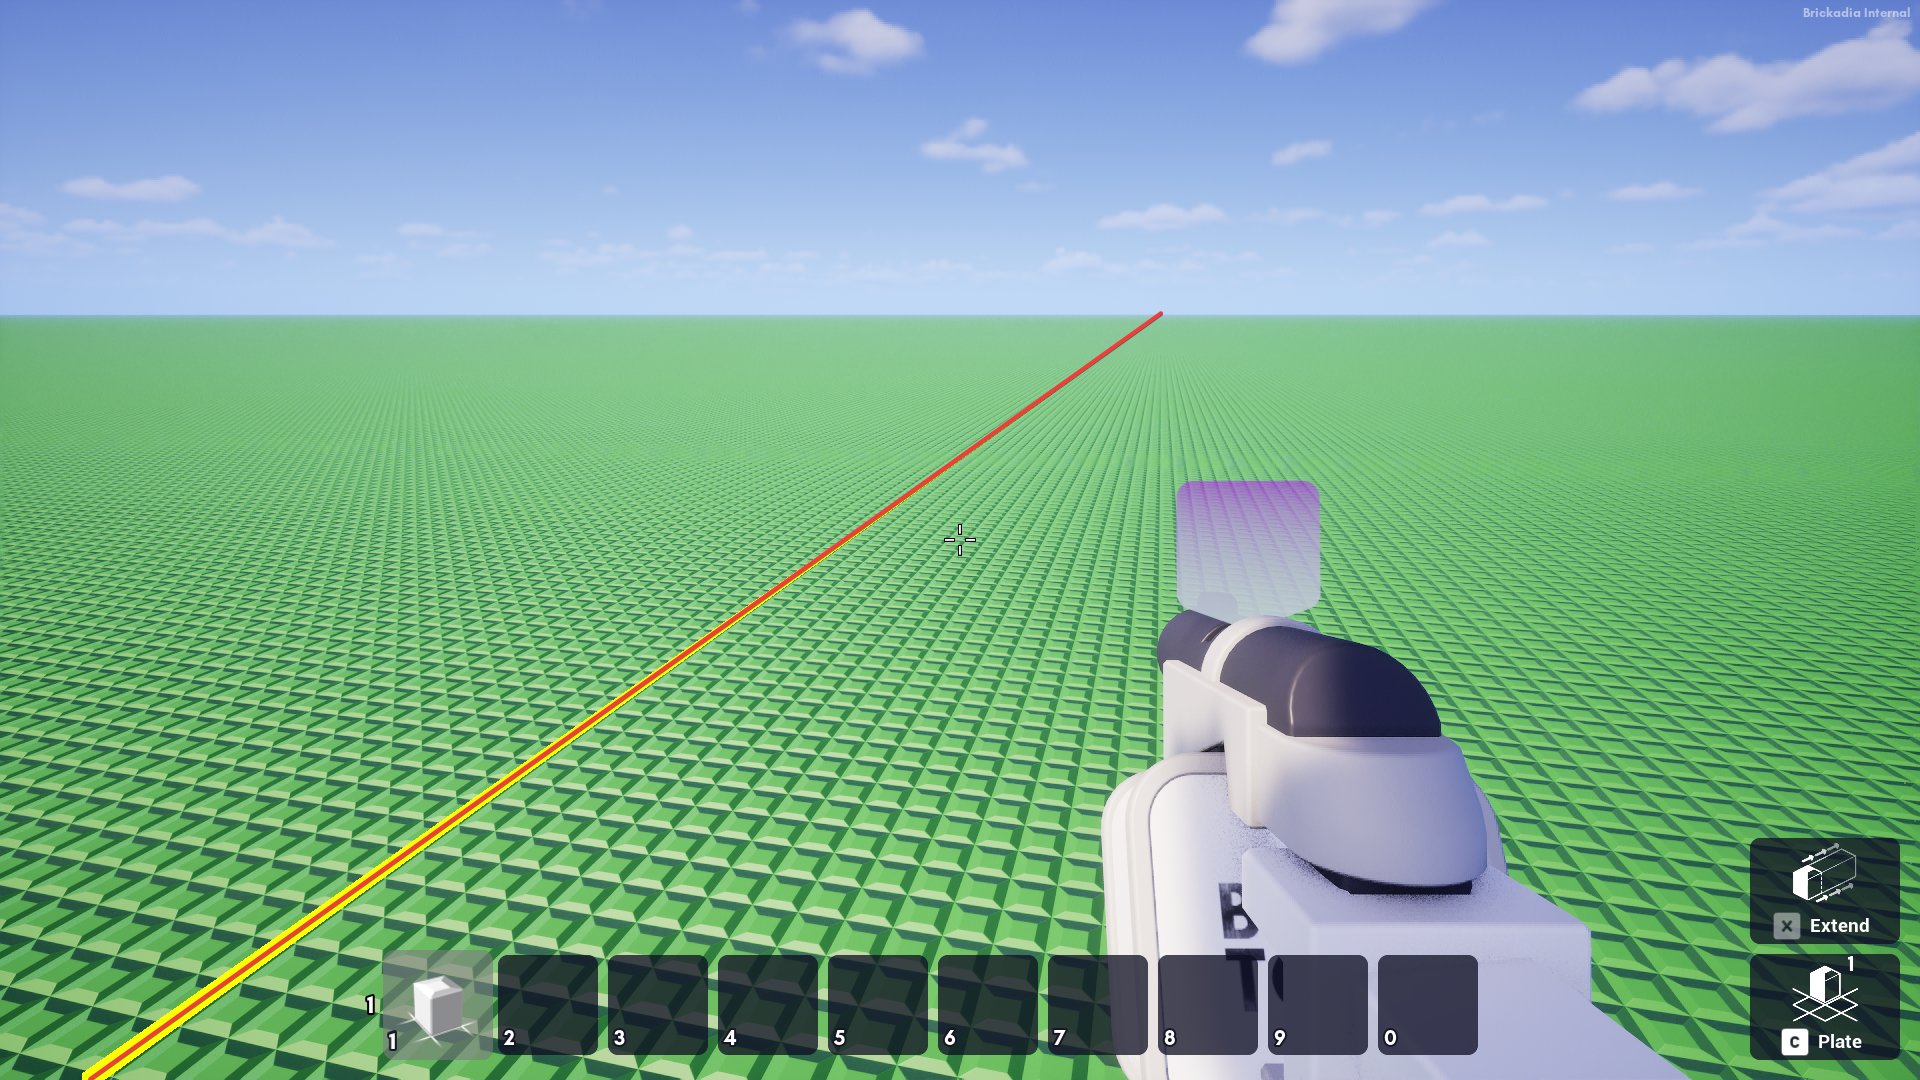
We can improve it further by binding the mouse wheel to changing the distance, so you can move the brick closer or further away.
Gizmos and the Preview Grid
You've been seeing a grid in the last few videos. That grid is not the same one from Alpha 5 - it's been re-implemented as something called a gizmo.
A gizmo is a rendered element that provides interactivity and/or feedback when working with 3D scenes. You may have seen these before:
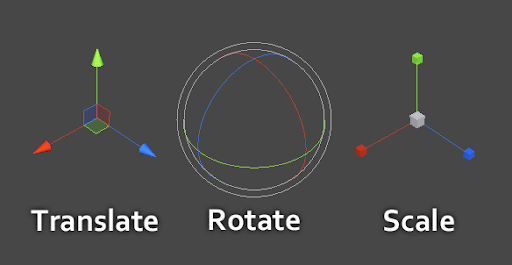
These are common gizmos you'll find in engines like Unity and Unreal, as well as modelling tools like Blender. And soon you'll find them in Brickadia. But more on that in another post.
Unreal's Interactive Tools Framework provides an entire system for displaying arbitrary gizmos at runtime, and previously, Zeblote has done work that allows me to draw things in the engine's Editor compositing layer at runtime too. It only makes sense to make some use of it!
I started by creating a gizmo manager which we'll provide with some materials to draw gizmos with. You can register gizmos with it, and gizmos are allowed both to control actors, and do manual drawing with ITF's gizmo elements. Let's do some quick testing to make sure it can be configured to draw things on top of everything else:
Dragging Brick Rows (Old)
Do you remember when I said that previewing brick placements was the second most complicated part of building? This is the most complicated part. We need to determine, with only a world start location and a camera angle as our inputs, which direction the player wants to drag their brick row - up, down, north, east, south, or west - and how long they want it to be. To recap:

In Alpha 5, we already had an algorithm to do so that worked roughly like the following steps:
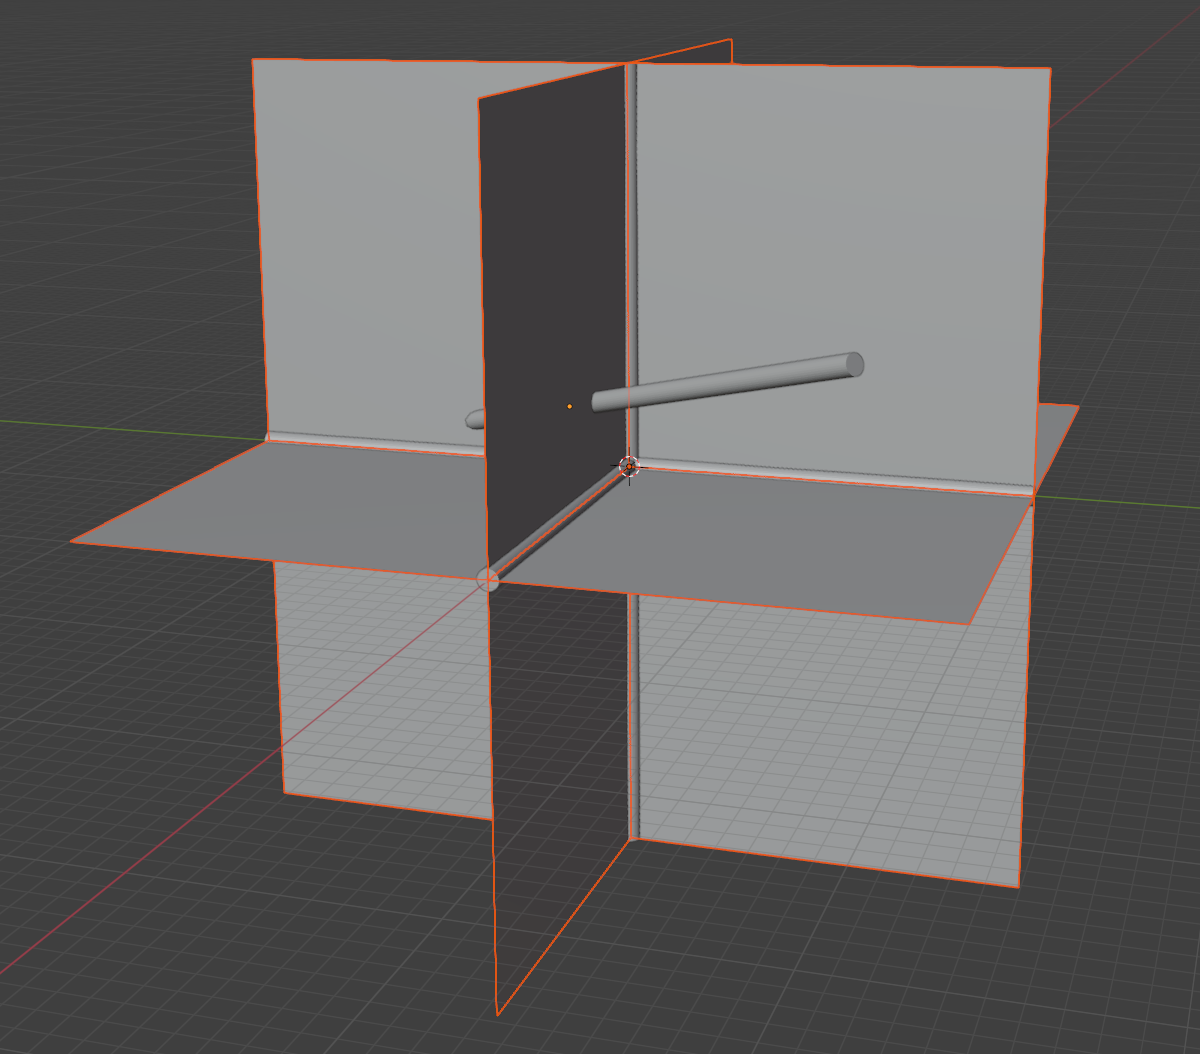
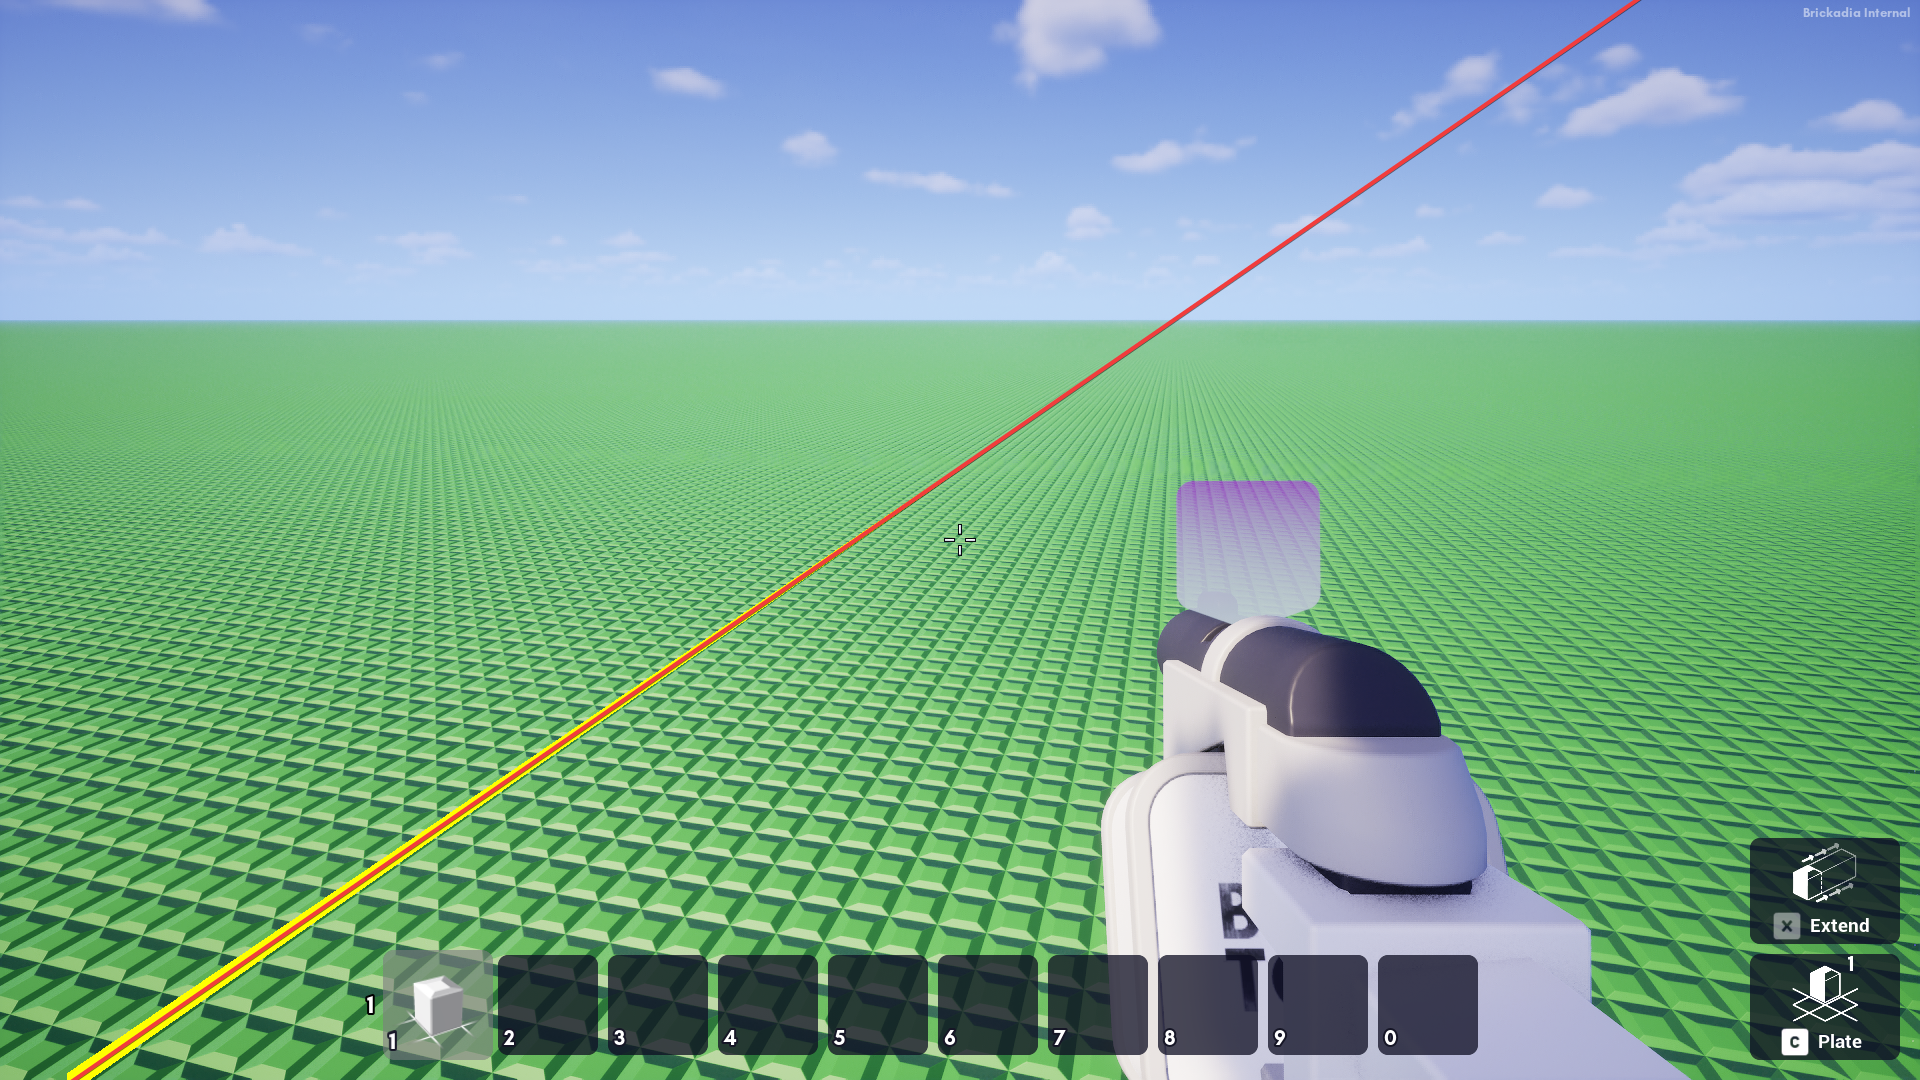
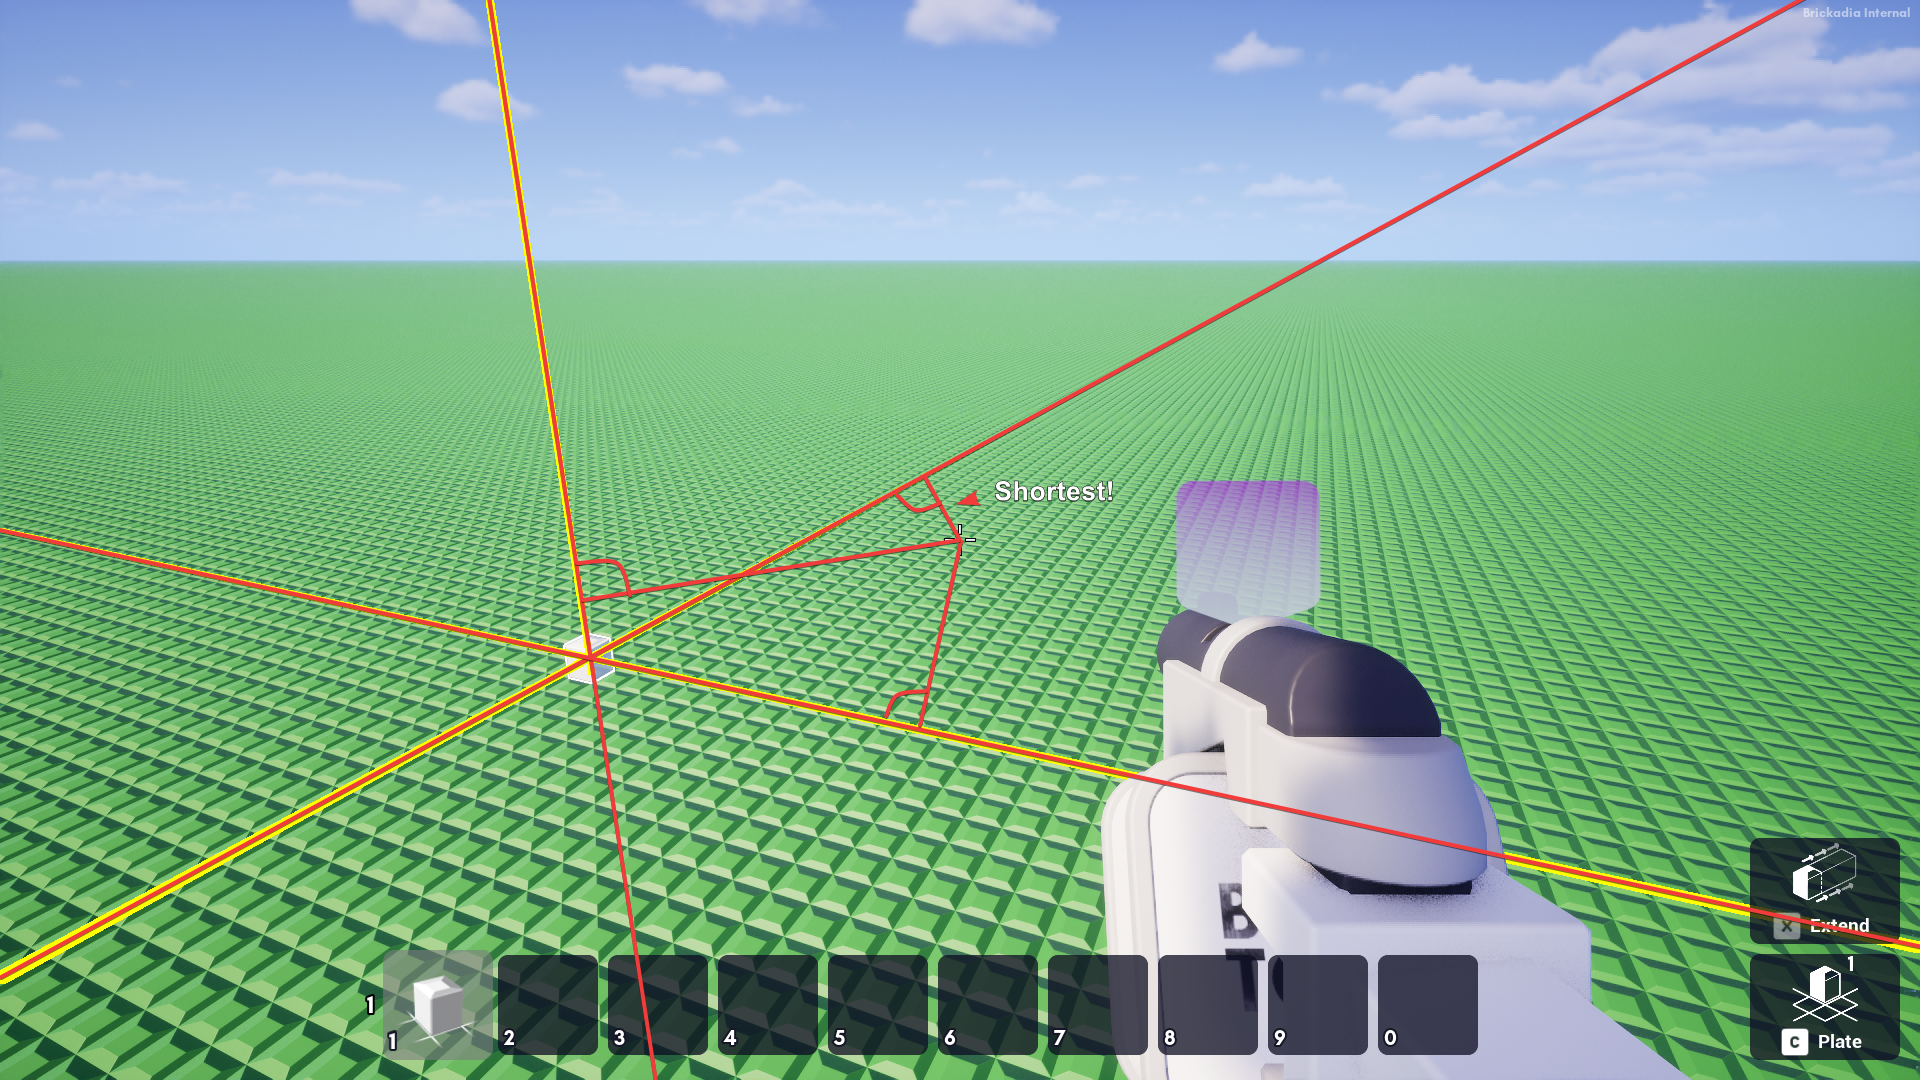
1. We convert everything to local space relative to the position the row starts at. From there, imagine lines extending in the direction of the 3 axes. The crosshair can be converted to a ray from the camera origin into the world.
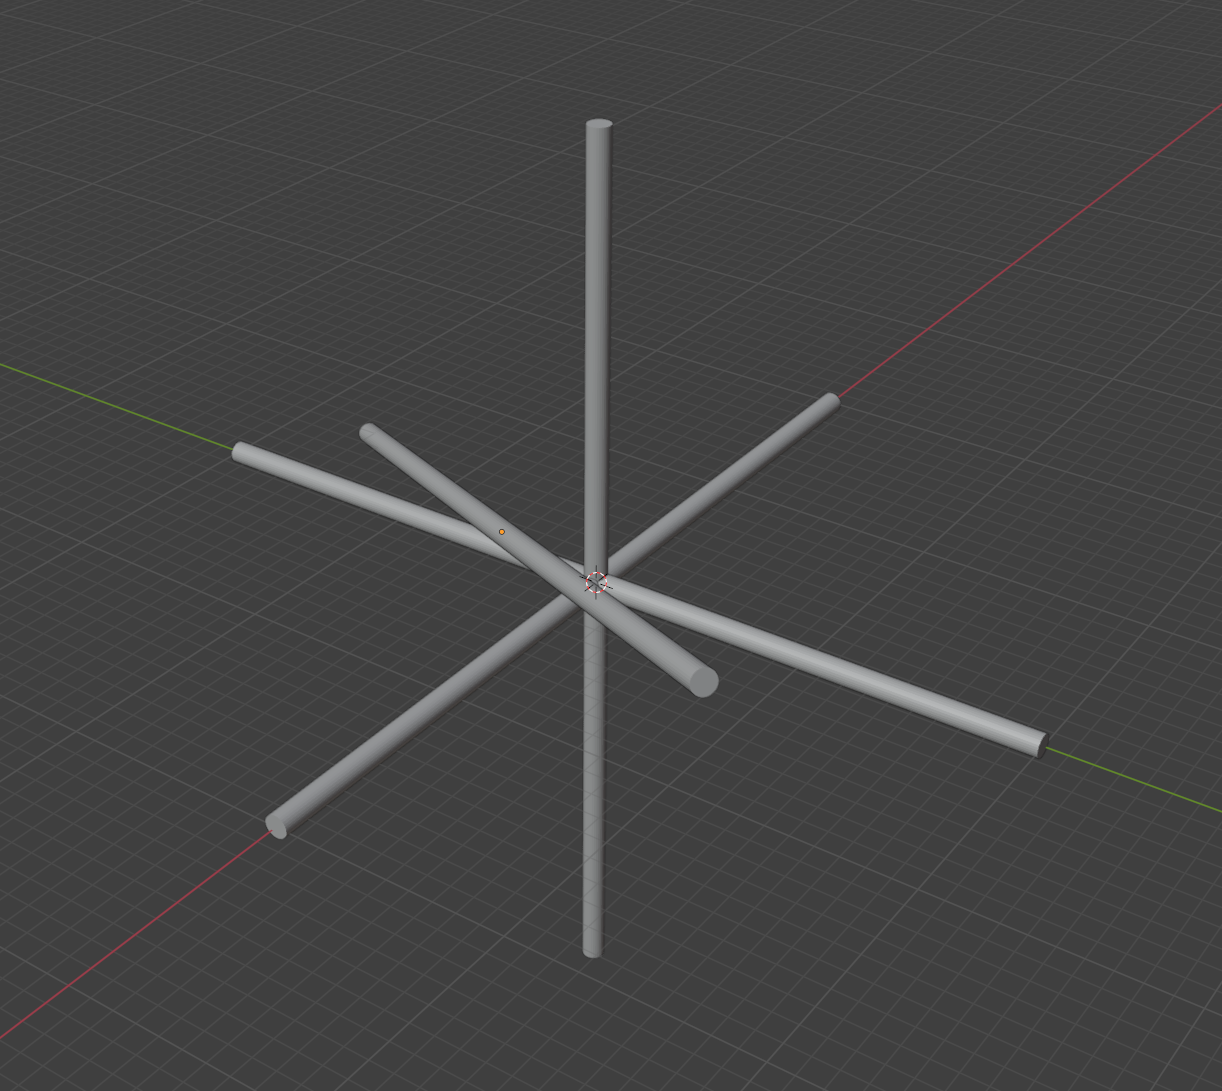
2. Now, we construct 3 axis aligned planes between each pair of axes, then intersect our ray with each of them. This gives us up to 3 intersection points.
3. For each plane, we determine how close the intersection point is to the axes.
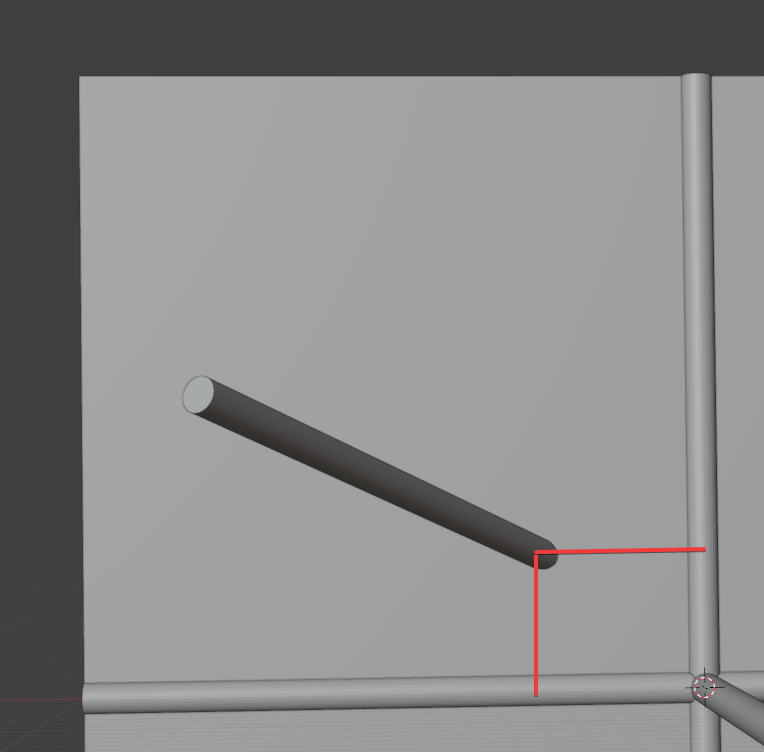
4. From these, we select the intersection point that is closest to an axis overall. The nearest axis will then be used to drag along.
5. From there, we simply have to snap the distance along the selected axis to the grid cell size and return the result.
This algorithm produced mostly sensible results in most cases, and worked well enough for the Alpha. However, there are many annoying edge cases that we could never figure out how to solve with this approach, such as:
Dragging Brick Rows (New)
The problem is this existing algorithm is not very good at the transitions between planes. It constantly annoyed us by randomly jumping around as it selected a different plane to be closer and produced unintuitive results. So after I pushed the first building changelist, Zeblote rewrote this function to select the closest axis to your cursor in screen space instead.
1. We start with the same axes and crosshair:
2. We project those world-space lines to screen-space lines. This sounds trivial at first, since Unreal Engine already provides a ProjectWorldToScreen function. All we need to do is pick two points on the line (such as the origin and one unit away) and we'll have screen space points defining our line in 2D.
However, there's a problem with that approach. In some cases, you might want to start dragging a row and then move or turn your camera far away, until the start point of the line is no longer on screen at all. This then breaks the projection.
So we need a more robust way to construct screen space lines. There is a simple solution in theory, we need to find two points on the axis that are actually on screen, but how can we do that reliably?
One way is to clip the line inside the view frustum, so we end up with a line segment that is entirely on screen. In the above image, this would effectively select the point at the bottom left corner and the point at the horizon.
We can then extend the line segment again to make sure it reaches the edges.
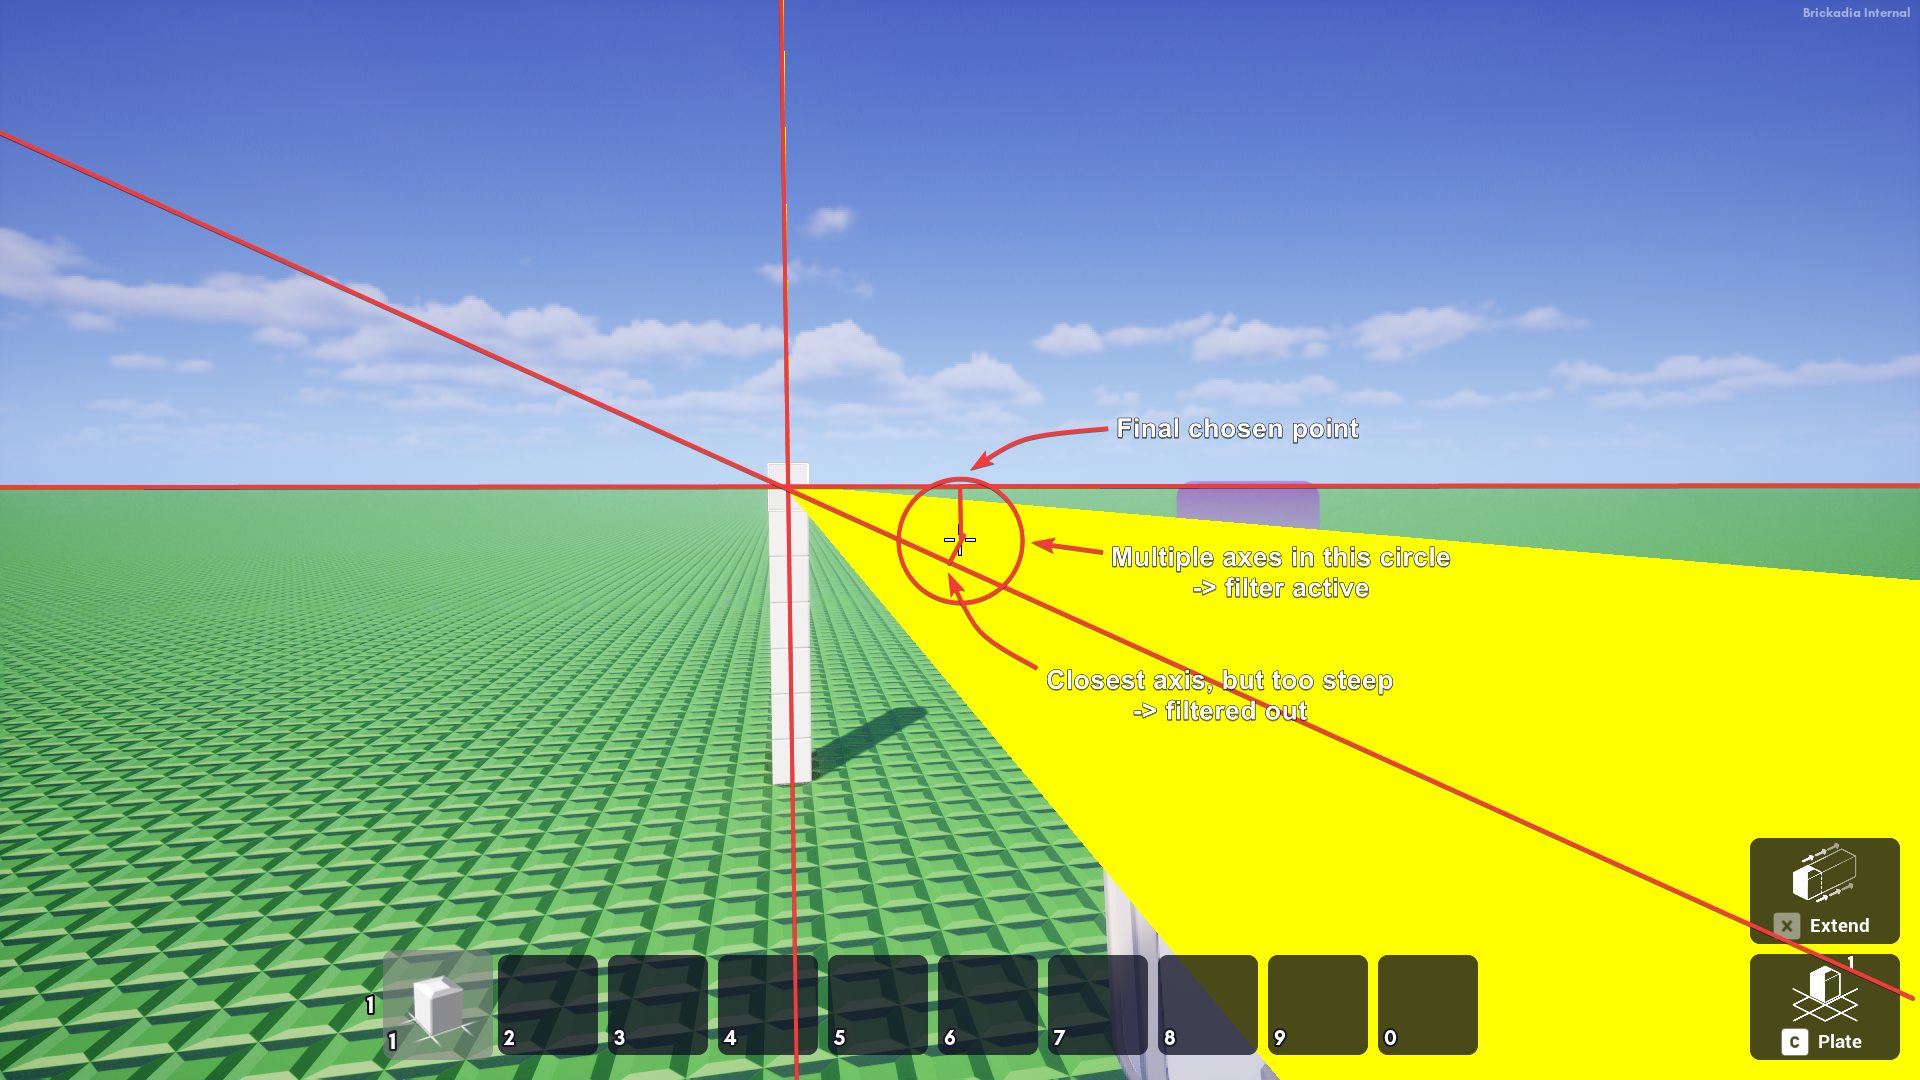
3. We select the line that is closest to the cursor in screen space. This effectively divides the screen into up to 6 zones that will select one of the axes, but they're not necessarily the same size.
4. There's an additional filter to reject axes that are very steep when multiple axes are near the crosshair at the same time. This fixes the issue of extending the row into your face when you are looking at the brick from a steep angle.
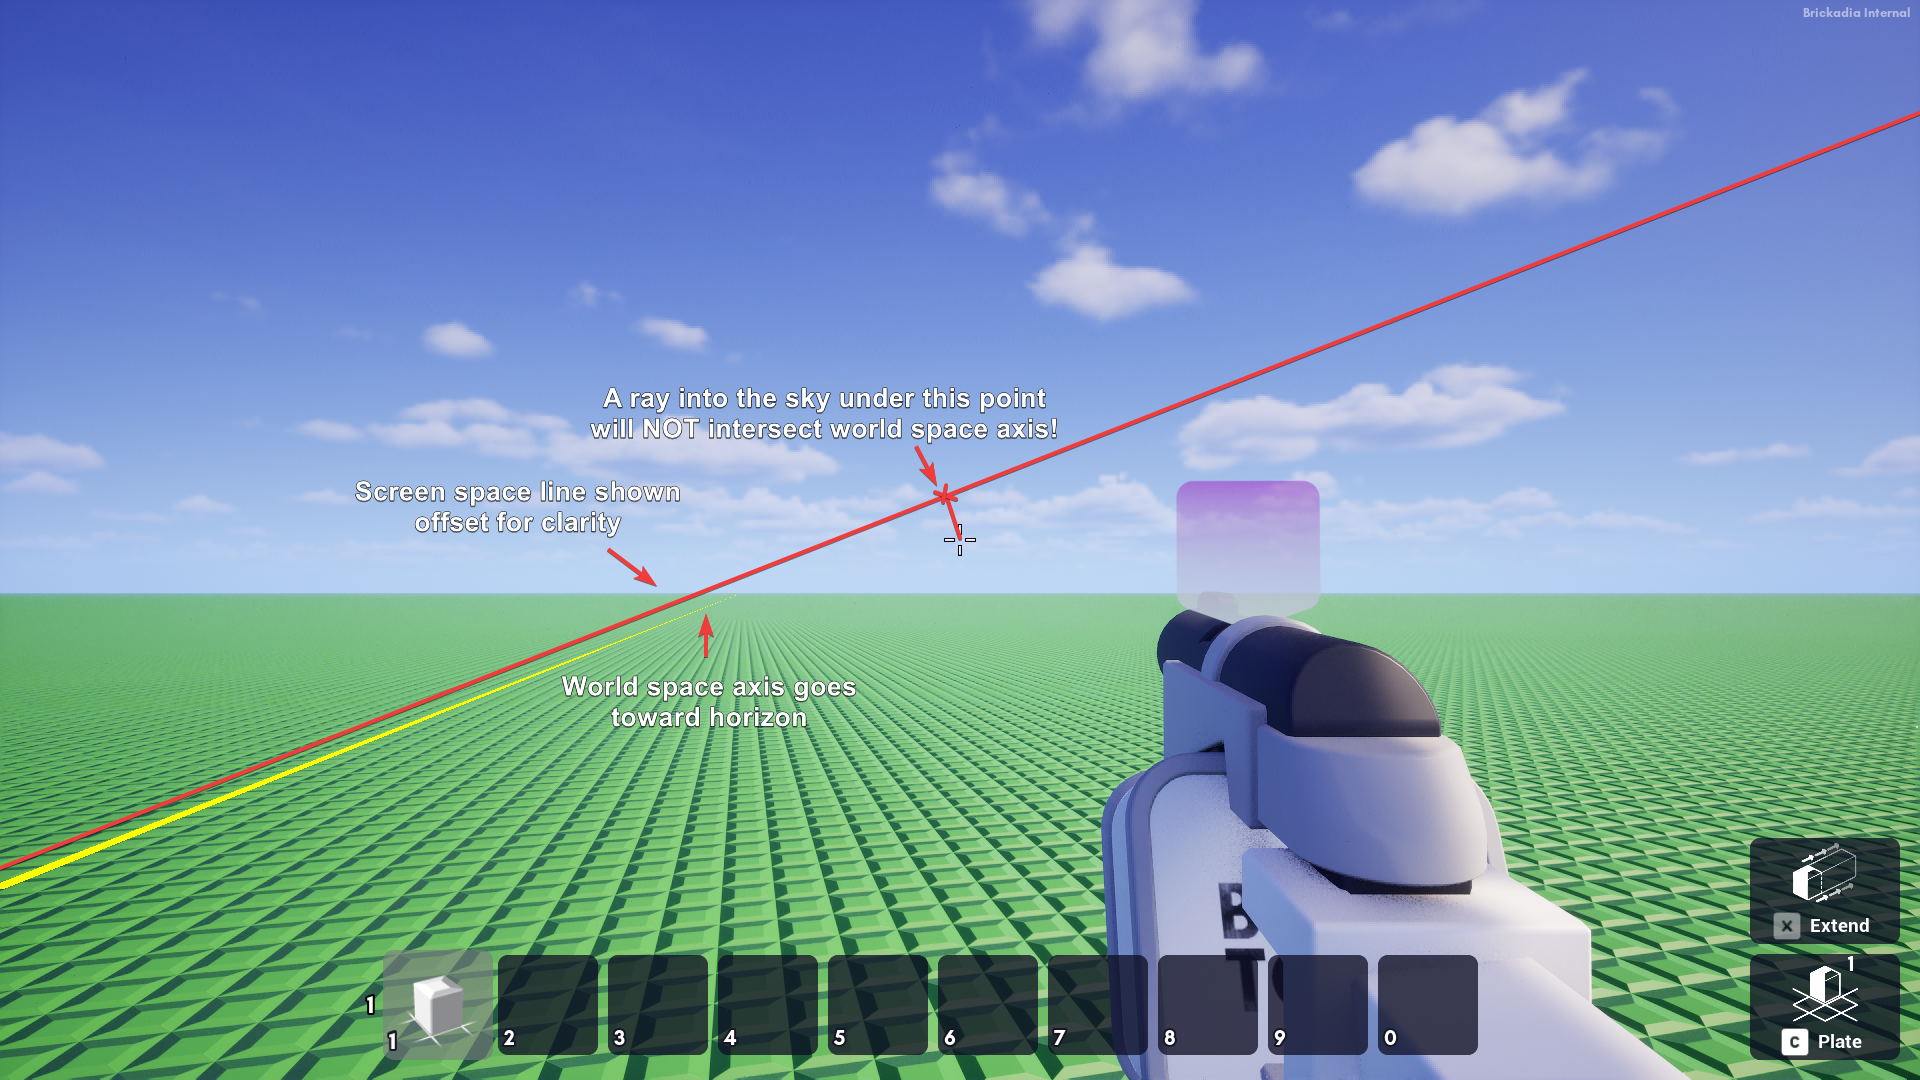
5. Once we have our chosen point on the screen space line, we need to convert it back to a world space point so we can calculate how far along on the axis it actually is. We could attempt to do some linear algebra here, to figure out what distance along the screen space line equals what distance along the world space axis, but that seems annoying given the perspective view.
So we just use the existing DeprojectScreenToWorld function in the engine to construct a ray from the camera origin going into the scene. By finding the closest point on the world space axis to this ray, we've finally got the point we wanted. What an ordeal!
Also, there's one more edge case to take care of, if we're looking away from the axis (even though it is on screen), that trick won't work, because the ray will diverge from the axis. So we detect that special case and just drag a row to the maximum length along the chosen axis.
Once we picked an axis and world space point, we figure out the row length the same way as before, and we finally have row dragging working again. It's much more robust now, and the edge cases we had above no longer happen.
It's trivial to add in spacing too.
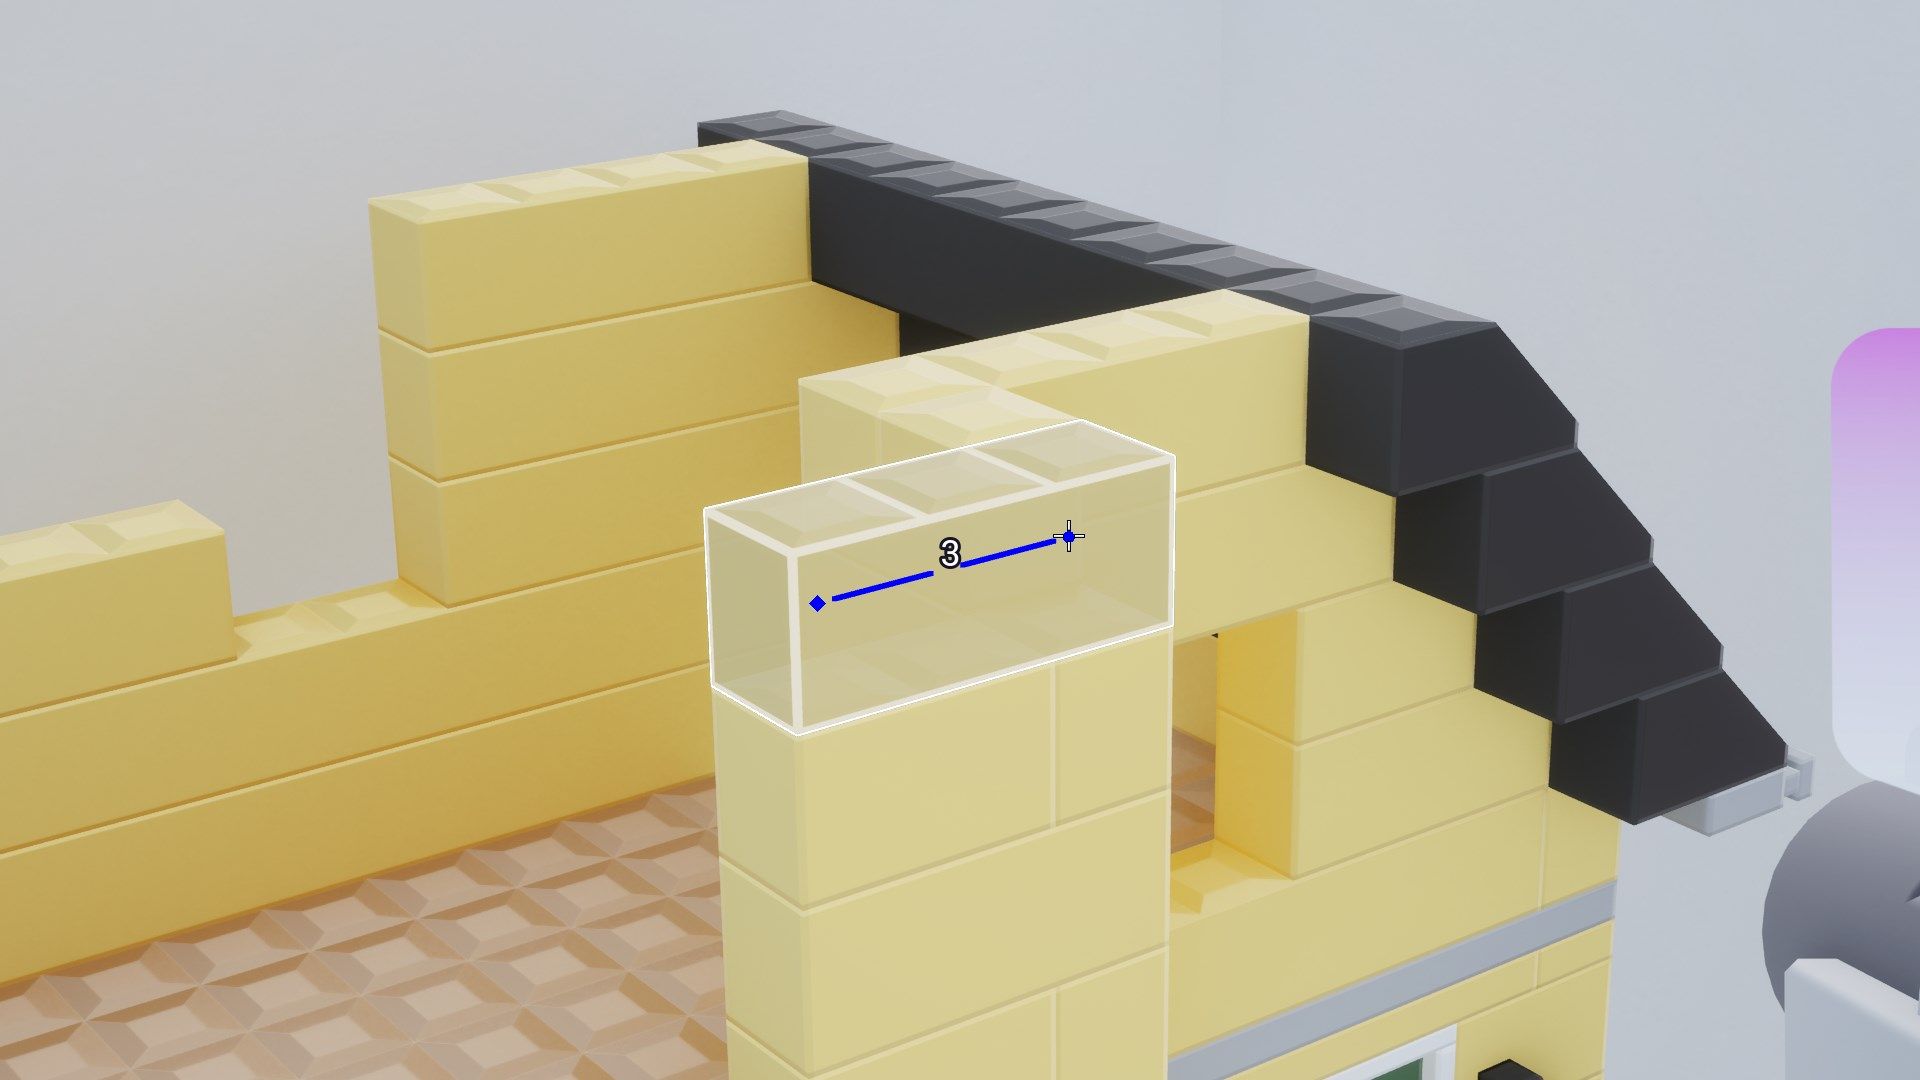
But we're not done yet - Let's take advantage of our gizmo system to display a line on top of everything showing the drag start point and both ends of the row. Near the active end, we'll display a row length in-world.
Resize-Dragging
Resize dragging is a simple extension to row dragging, it mainly involved changes to the very last part of the row dragging math. Instead of resizing the brick in increments of the brick size, as if we were row dragging, we resize in increments of the alignment grid size, skipping increments that don't line up with valid dimensions for the brick type. That means we resize on our grid, like this:
We can still resize in increments of the brick size, if we change the grid size:
One note; we need a special case if the brick's starting size does not entirely fill the grid cells it's in. In this case, for the first increment we want to size it up slightly less, so we only resize up to the grid line:
But what use is being able to resize only in one direction? Let's quickly add the support for switching axis with RMB. The row dragging math only needs a few more branches to filter out axes that we've already locked in.
We can easily allow this in row dragging mode too to create "grids" and "volumes" - 3d grids of the same brick with arbitrary spacing.
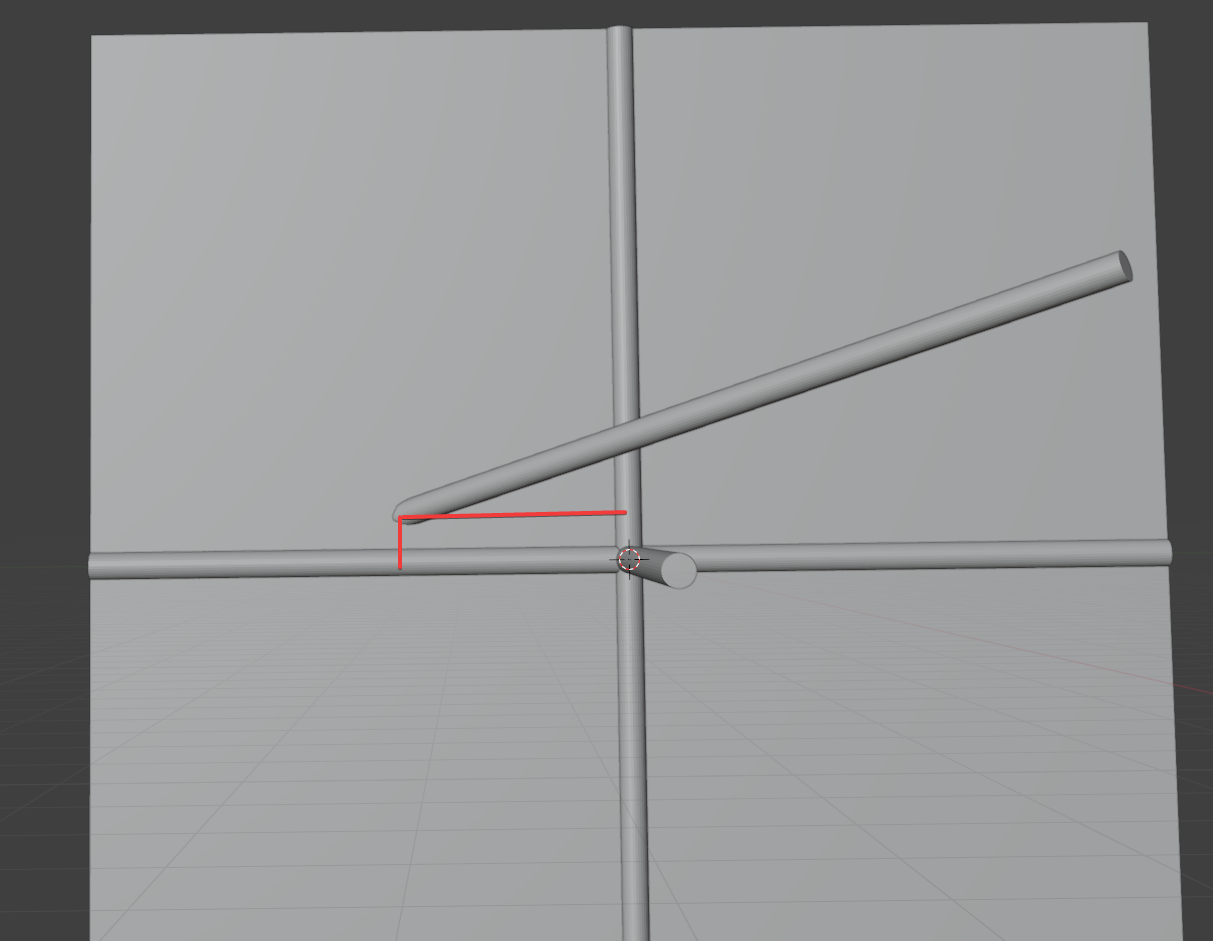
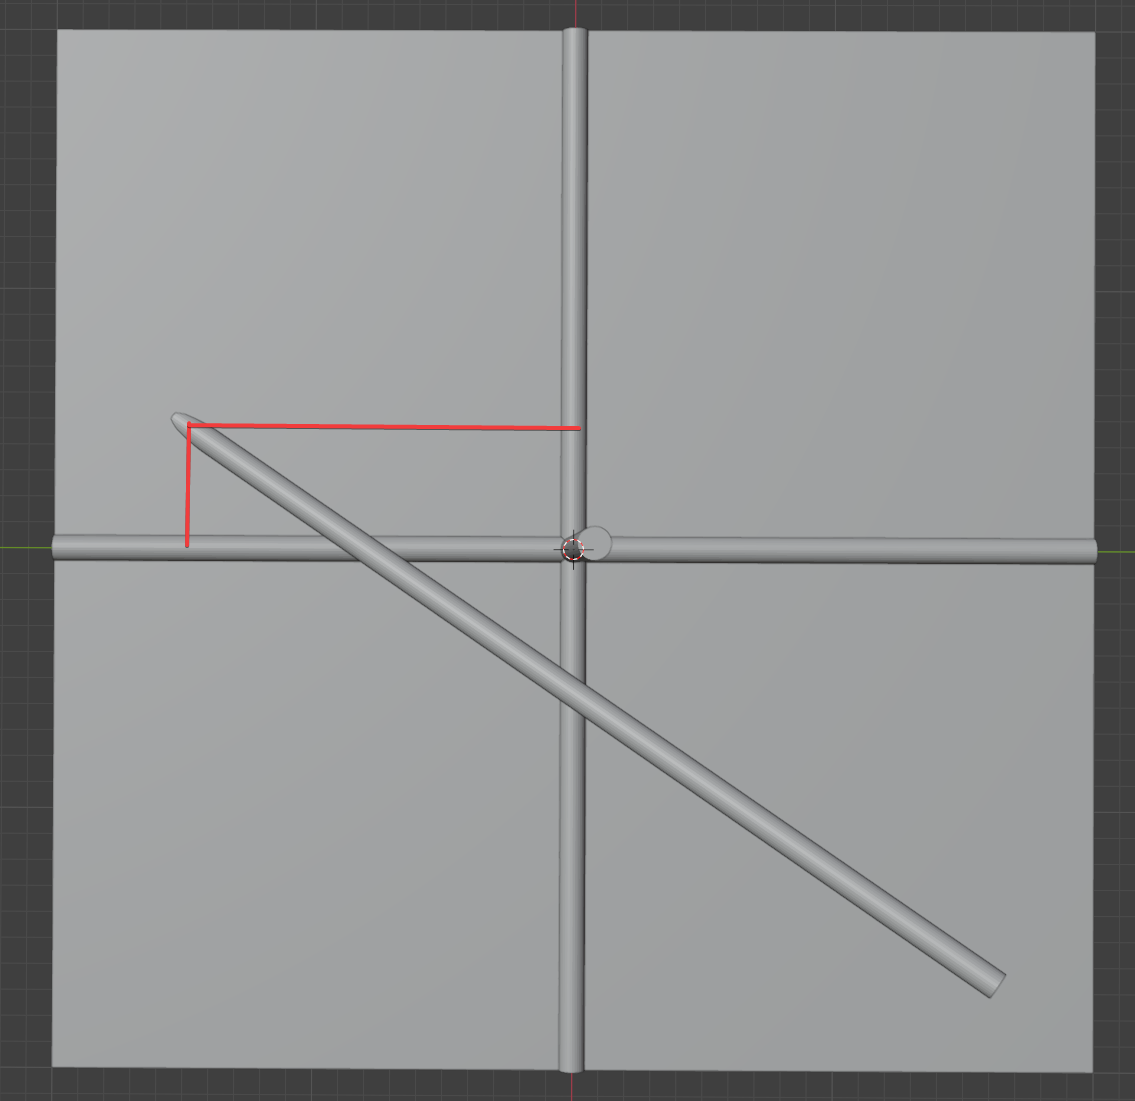
Rotation and Reorientation
It's easy to make tapping R rotate our brick clockwise, as before. But remember how we wanted to reorient bricks to the closest direction to the cursor? Well, that's exactly half of how row-dragging and resize-dragging already work.
We'll activate this new behavior if the player holds R for more than 200ms and moves the mouse, then finalize the orientation once they release it. While reorienting, we simply make the brick's up direction point towards where the mouse is.
And of course, we made a gizmo for this too.
Tool Widgets
Our HUD is looking quite bare with the new placer.
The old one modified some text that was manually added to the A5 HUD - but that text has been removed from the EA one, depriving us of some important information the old placer, resizer and other tools were able to report by modifying it.
Actually, doesn't this case happen a lot? There are two other tools I can think of that put information on the screen - the Painter and the Resizer - and yet we manually modify the HUD to add their widgets every time, then just make the tool unhide them. Shouldn't we have a better system? We should, right?
Here's that better system: All tools can now add an arbitrary "large" tool widget to the bottom right corner of the screen, and a "status" tool widget to the area above the quickbar. For the placer, we'll use this to display more measurements onscreen.
Tool Bind Hints
The new system is working nicely, but it needs learnability! We're in need of a means to display our new controls to the user in a way we can dynamically update in real time, because we want to display all the controls the user can use right now - and hide ones that aren't relevant until they are.
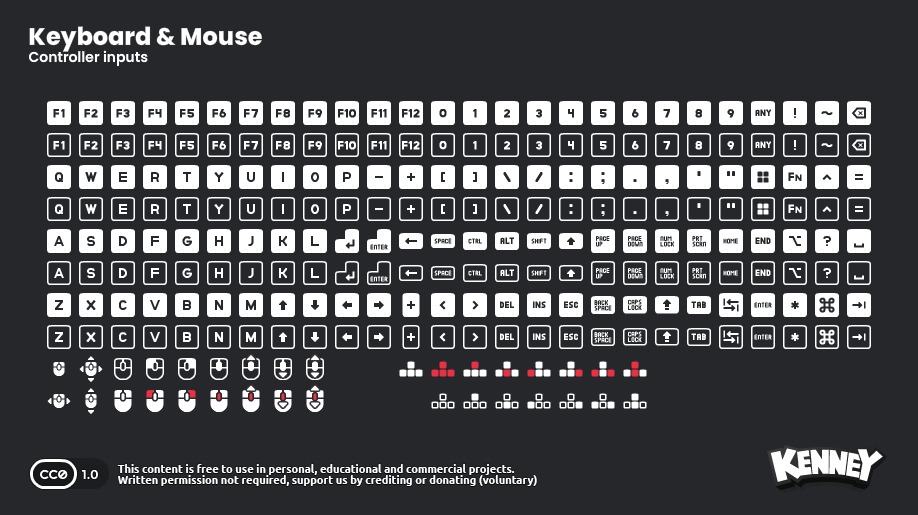
First, we needed a nice way to show any input. This CC0 pack by Kenney fit great into our new UI style, and they even fixed a bug we reported quickly. Can definitely recommend these for your project!

We then (manually, ugh) wrote a big table that would translate Unreal Engine FKeys to an icon texture reference from the Kenney pack, and a widget that given an Input Action or Input Axis name, displays the icon for the key bound to that action. Or sometimes multiple icons for chords like Ctrl+C.
Now that we had a way to display keys, we created a system called Tool Bind Hints. All tools are allowed to register them, and they look like this:
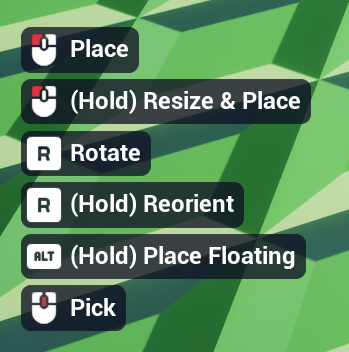
How it works is that all tools define a list of bind hints they display in any order they choose. For example, the placer defines this list:

Bind hints have tags, and the game chooses what bind hints to display by determining if they have any tags that are currently shown. For example, here's how the placer uses its tags:
- Previewing is set while the placer is previewing a brick position.
- Placing is set while the placer is dragging a brick row.
- SwitchAxis[123] are used to show the various switch axis prompts (this might be upgraded to a better solution later, bear with me)
- BuildingSpacing is set if you're placing in a placement mode that allows the usage of spacing (so we hide the spacing hint in resize-drag mode)
- FloatBuilding is set if you're using floating building (to show the scroll prompt).
- Reorienting is set if you are reorienting the brick.
And finally, here's a demo of its hint UI updating in real time as you place stuff!
Selection Highlighting
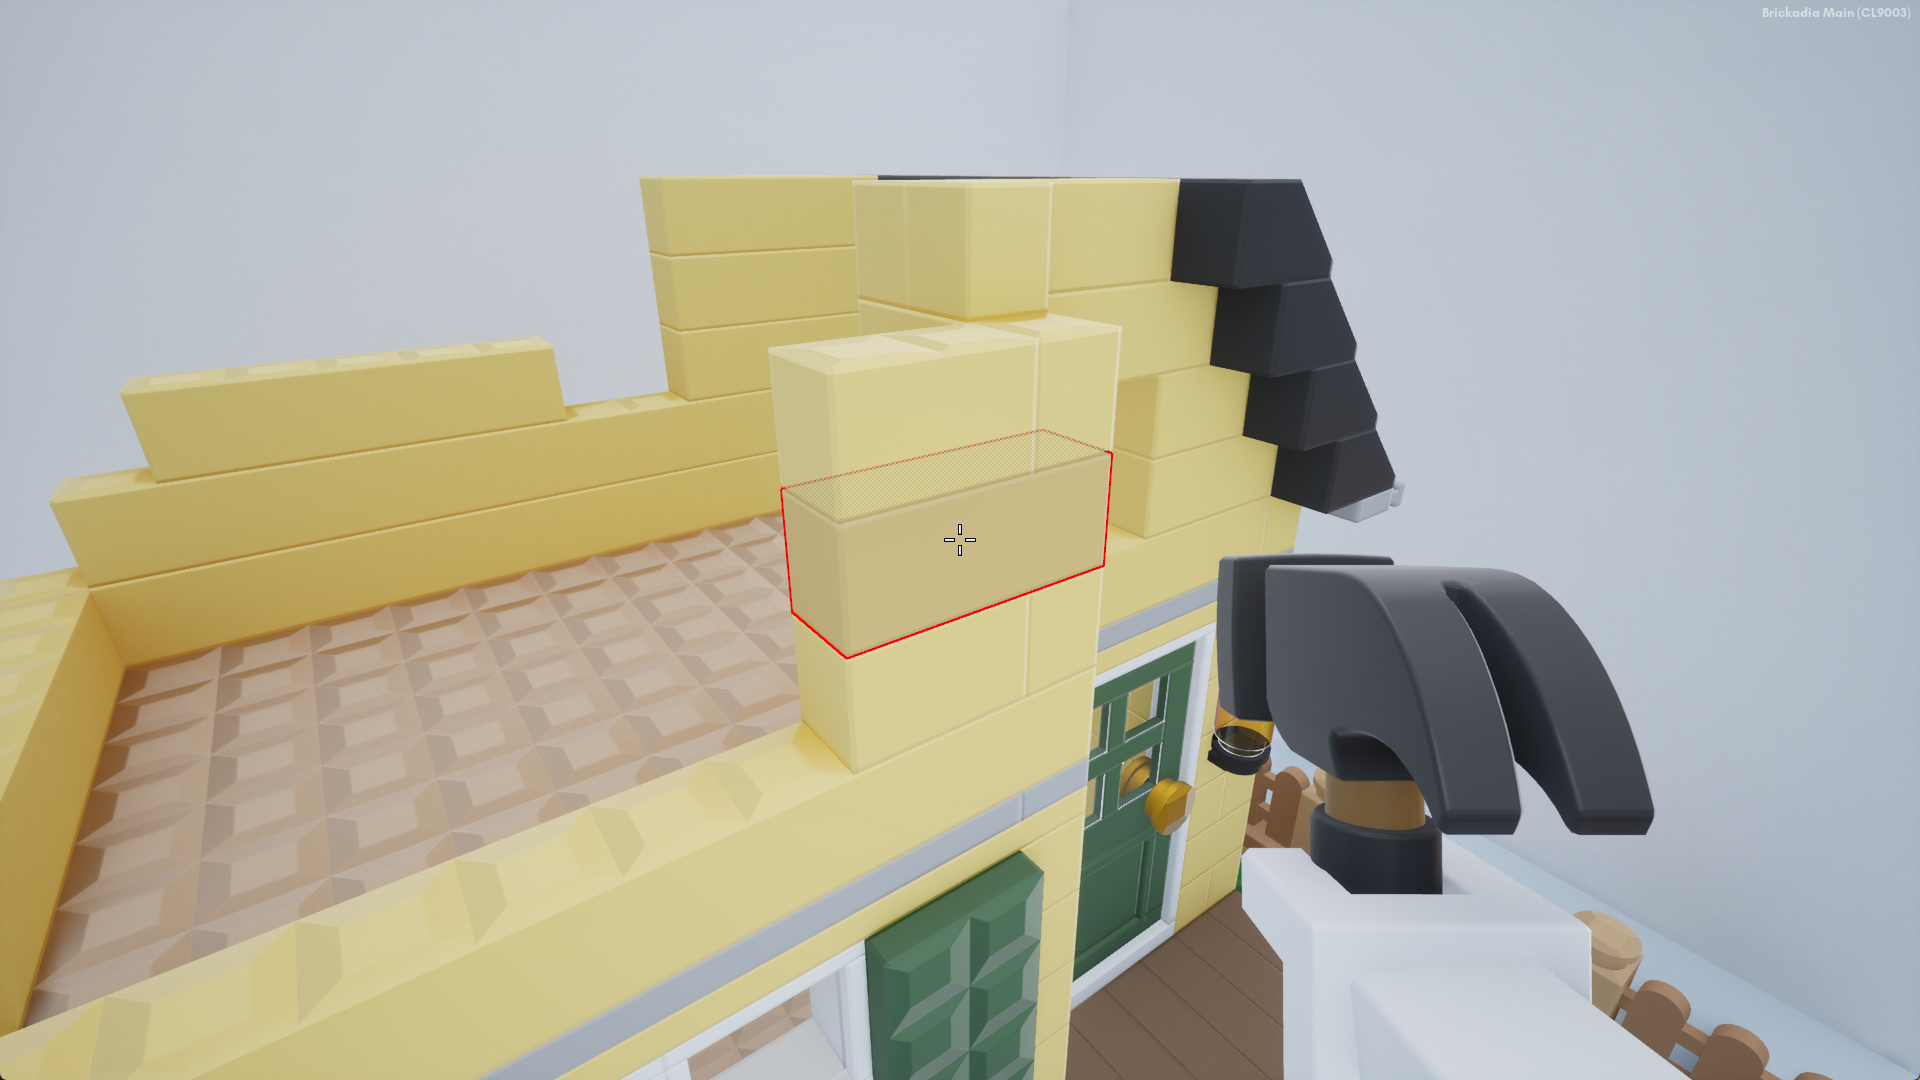
One more thing, we added a system to highlight specific bricks and objects with selection outlines in various colors. For example, the Hammer now shows you which brick is going to be deleted with a red highlight:
Placing new bricks also uses a selection outline around the preview, except it's white. Did you notice it in the videos above?
More to Come!
That's all I have for you today, but there's more coming soon. We'll show the new modes for building physics contraptions. We'll look at the new locking modes, which will bring back the plane locking functionality you can get by holding ctrl, and then some. We'll also be getting into the new orbit mode for building on a controller or Steam Deck, and some new detached mode features.
I look forward to seeing you then. Stay tuned!